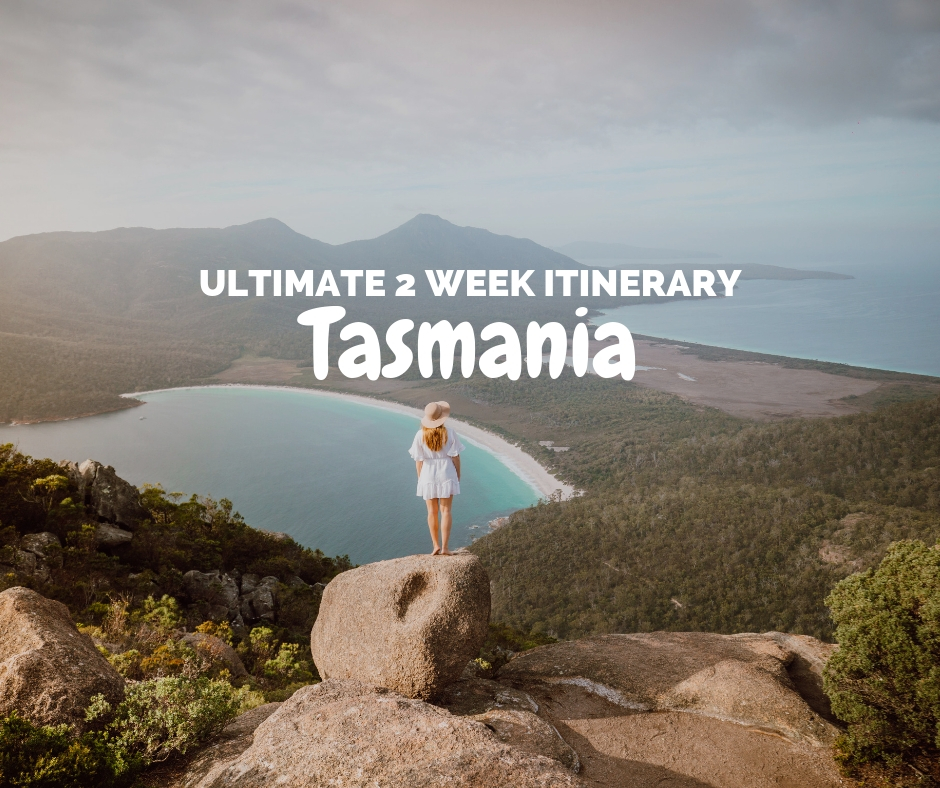
Are you currently planning your Tasmania road trip and looking at inspiration on where to stop and what to do? Look no further! This blog post will go over my entire Tasmania itinerary. We spent 2 weeks exploring Tasmania, but you could easily adapt my itinerary to be longer or shorter.
DAY 1 – HOBART
We flew into Hobart and took an Uber to our hostel (YHA) as it was cheaper than getting the bus. We could have picked our car up from the airport but it was a lot cheaper to pick it up a day later in the centre.
Hobart is a wonderfully quaint city, and easy to visit over a couple of days. The top things to do in Hobart include:
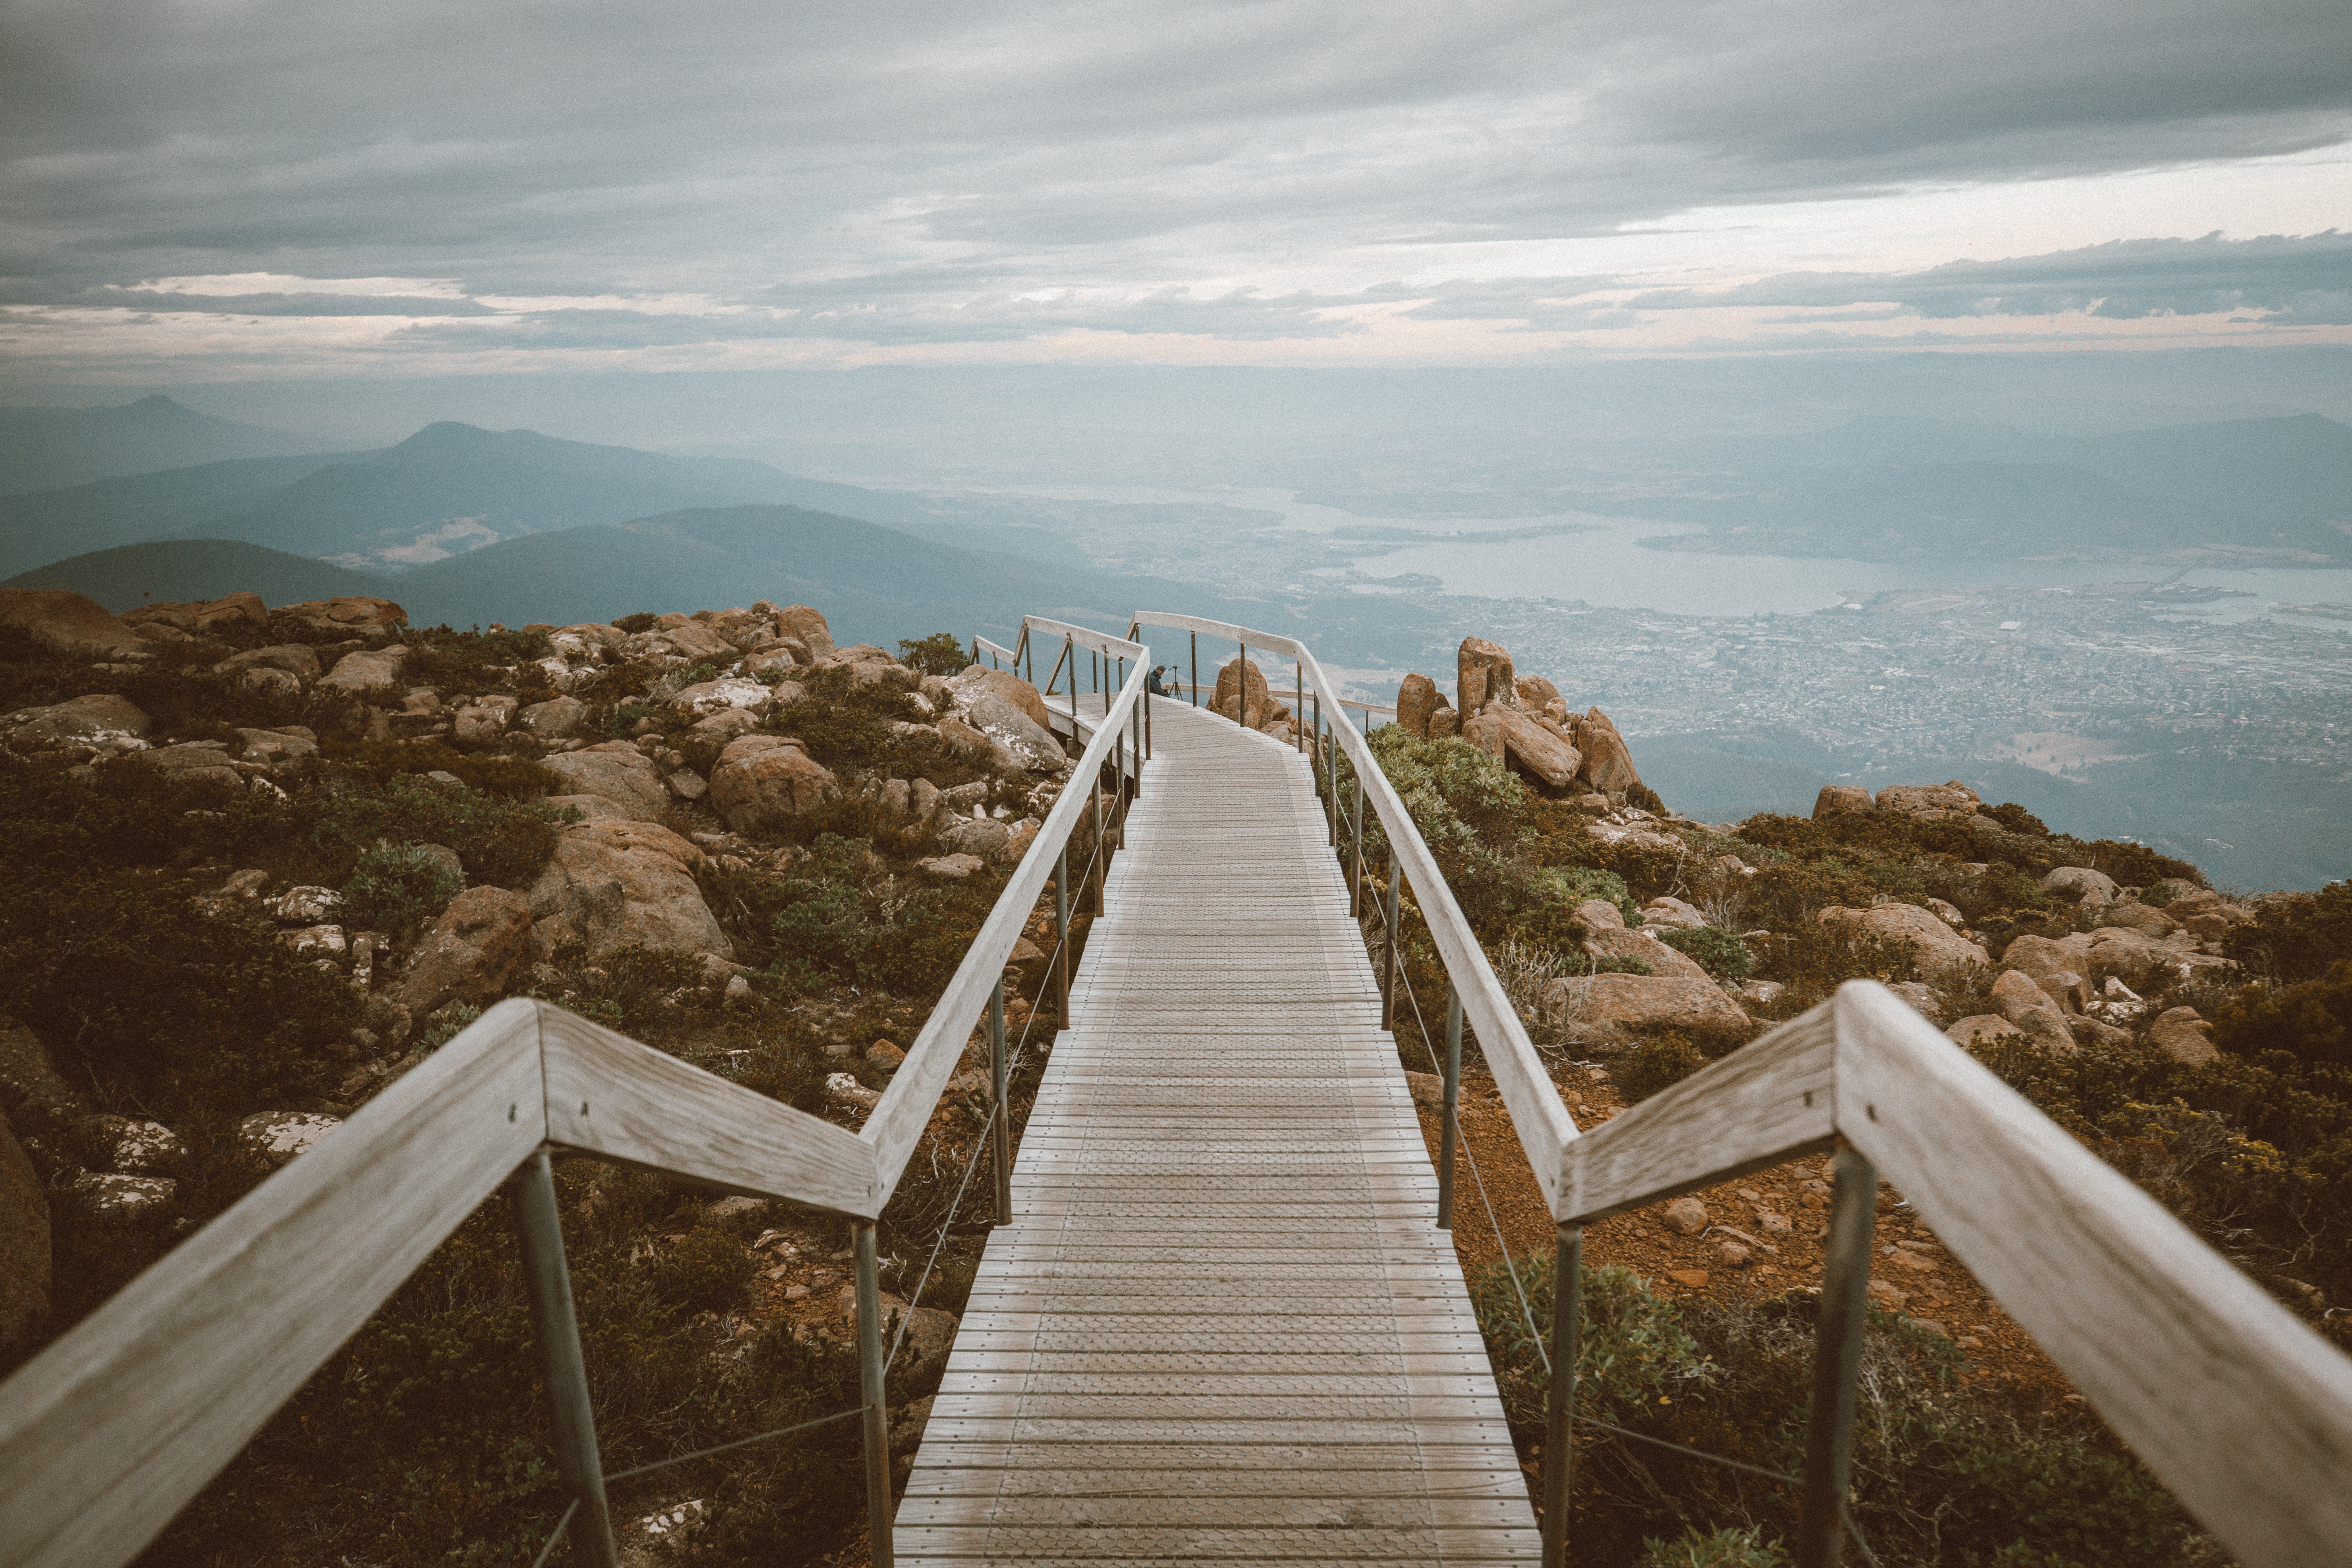
- Mount Wellington (go at sunrise or sunset for best light)
- MONA (closed on Tuesdays)
- Tasman Museum (it’s free!)
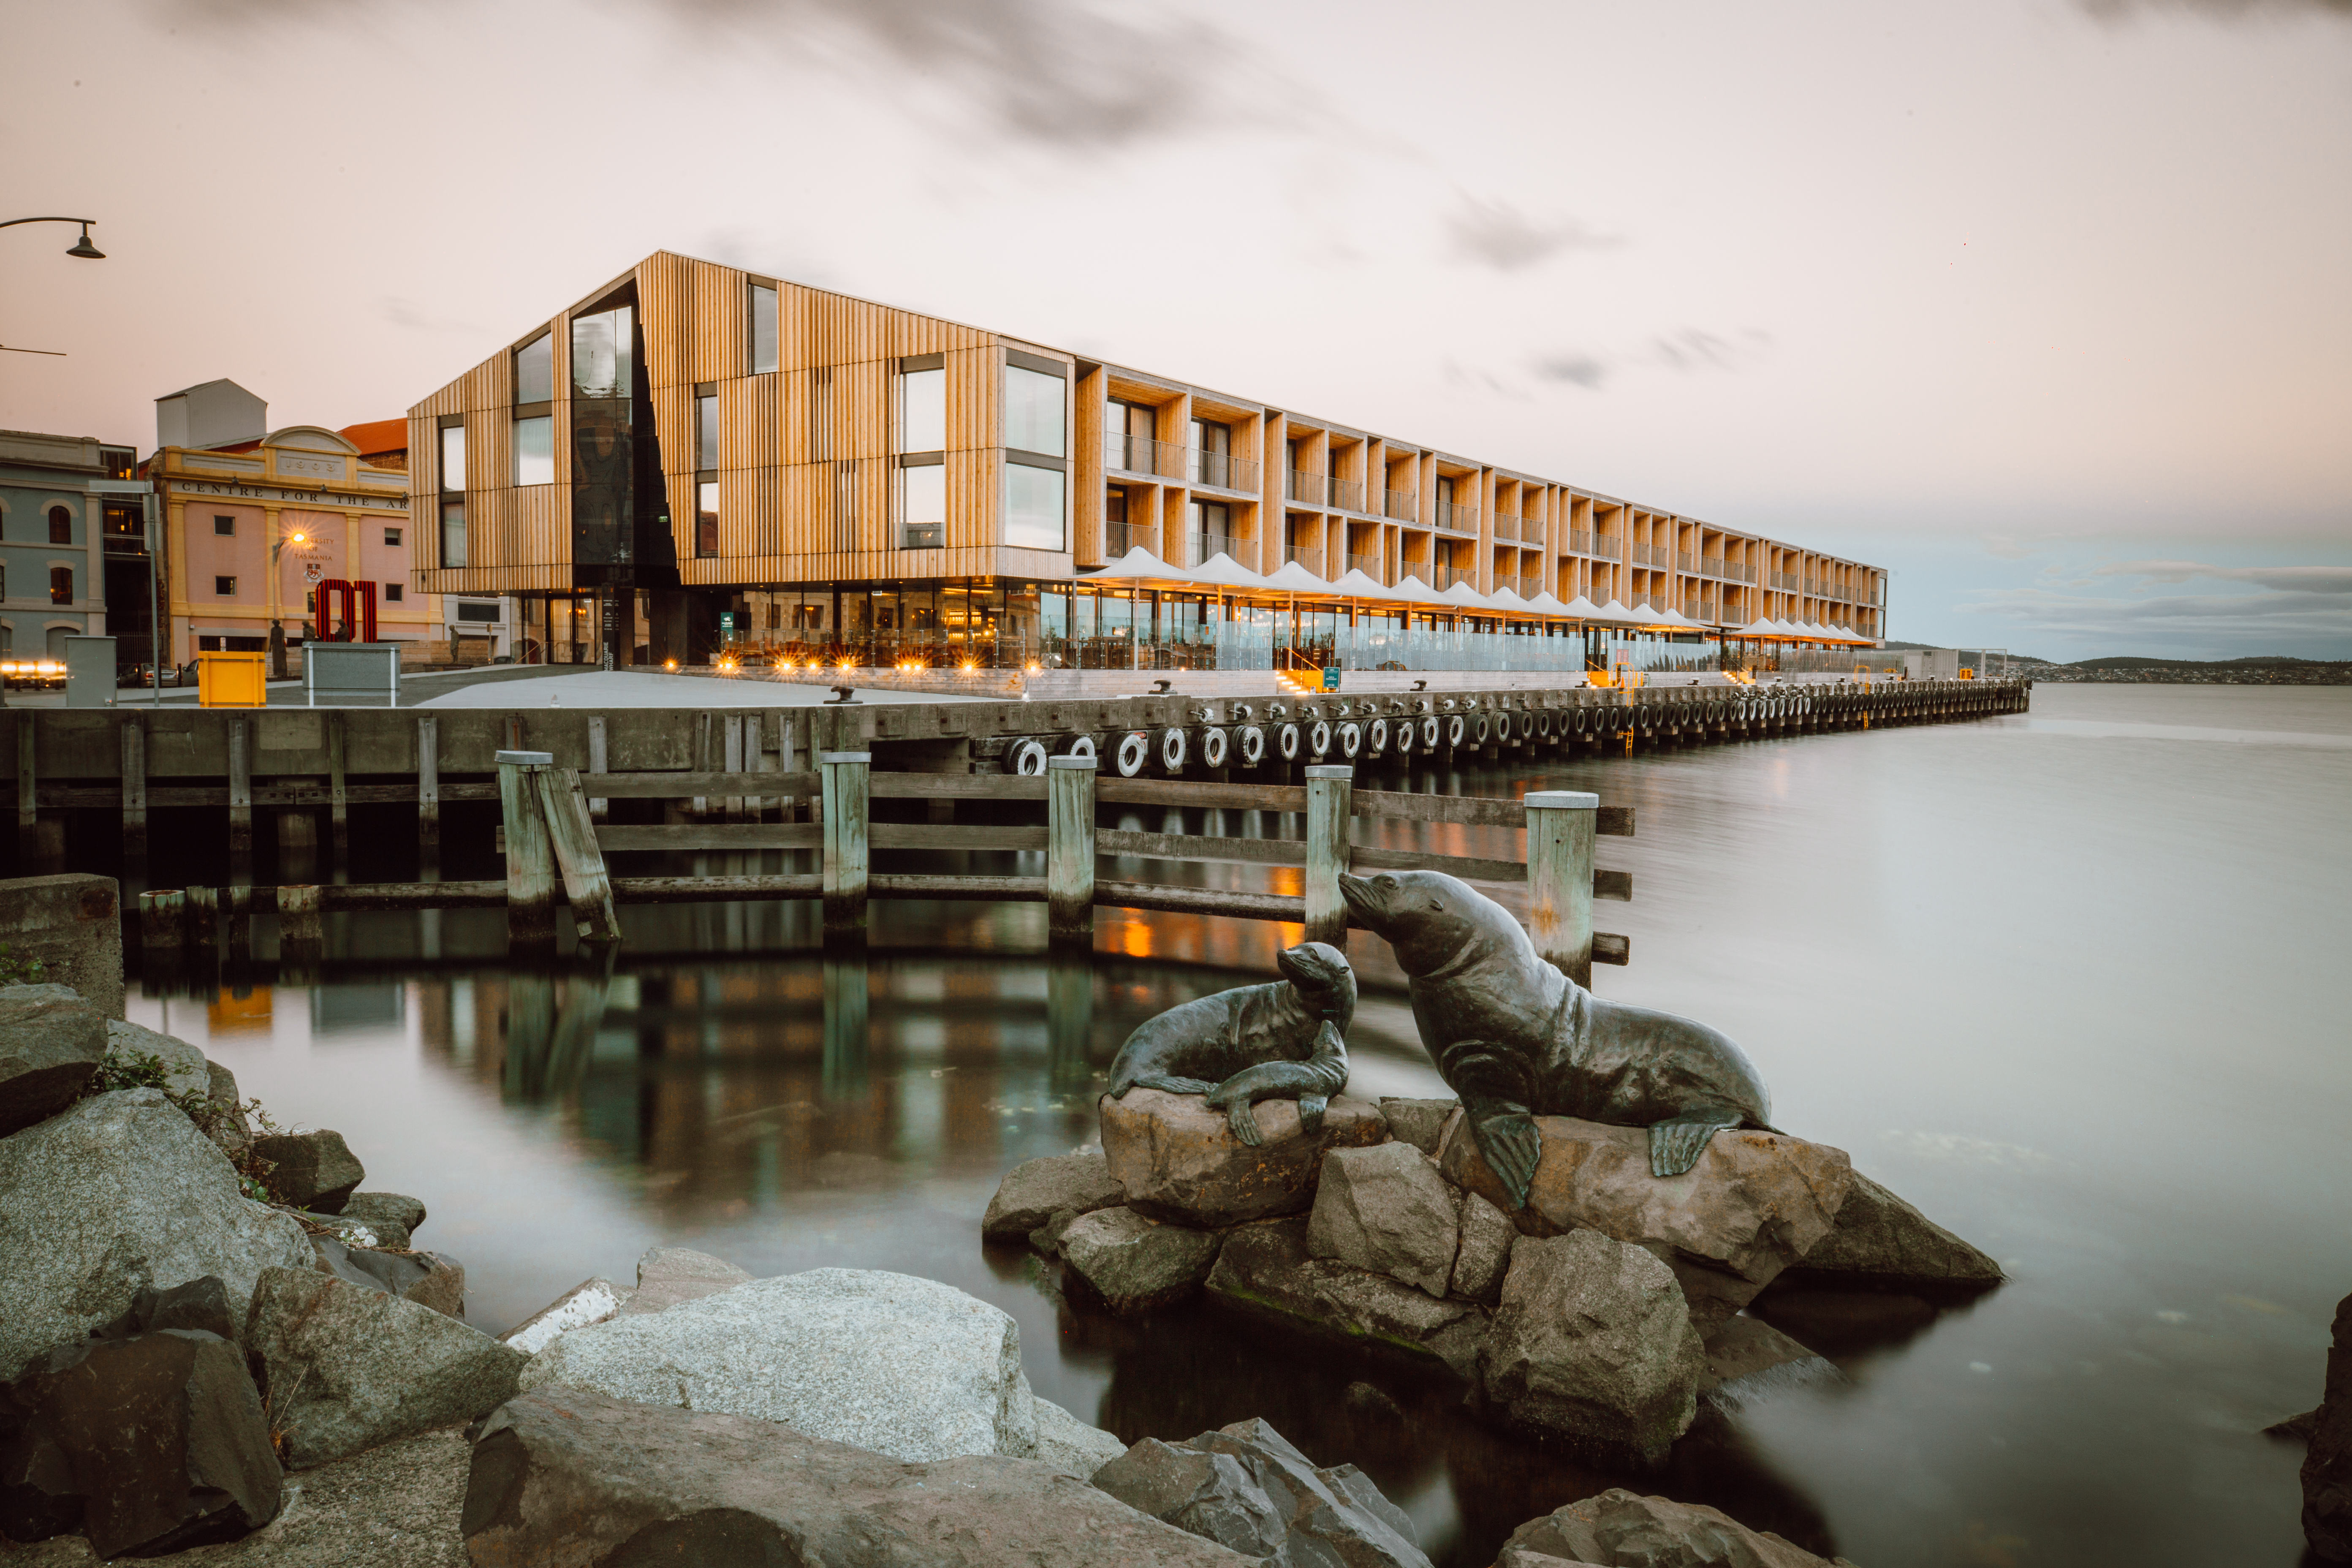
- Walk along the harbour front
- Salamanca Market
We stayed at the Hobart Central YHA, rooms start from only $29 a night . It’s centrally located just up the road from the Tasman museum. Perfect place to stay if you’re on a budget.
DAY 2 – BRUNY ISLAND
We picked up our car from Europcar (it was $189 for 2 weeks and we were upgraded to a 4 wheel drive!). We decided to start out journey exploring the south east of Tasmania and drove 30 minutes south to Kettering. Here we hired e bikes and caught the ferry across to Bruny Island. Bruny Island is still quite off the beaten track and amazed us with its rural beauty and dramatic landscape.
MUST SEE ON BRUNY ISLAND
- Cape Queen Elizabeth (the Arch)
- The Neck (penguins)
- Adventure bay
- Enjoy the local commerce
- Wild wallabies on the side of the road at sunset
Find out more about cycling around Bruny Island.
The majority of the accommodation is in South Bruny. We stayed at an airbnb near the neck as it was very fairly priced and was also close to the neck if we wanted to see the penguins at sunset.


DAY 3 – BRUNY ISLAND
We started the day cycling back north, making stops at all the local shops; chocolate, honey, cheese and beer and whiskey!
We caught the 13:00 ferry back to Kettering where we picked the car up again and drove two hours north east to the Tasman Peninsula.
We stayed at an airbnb for 2 nights, it was fairly priced but the outside loos wouldn’t be the best during the colder months.
DAY 4 – TASMAN PENINSULA
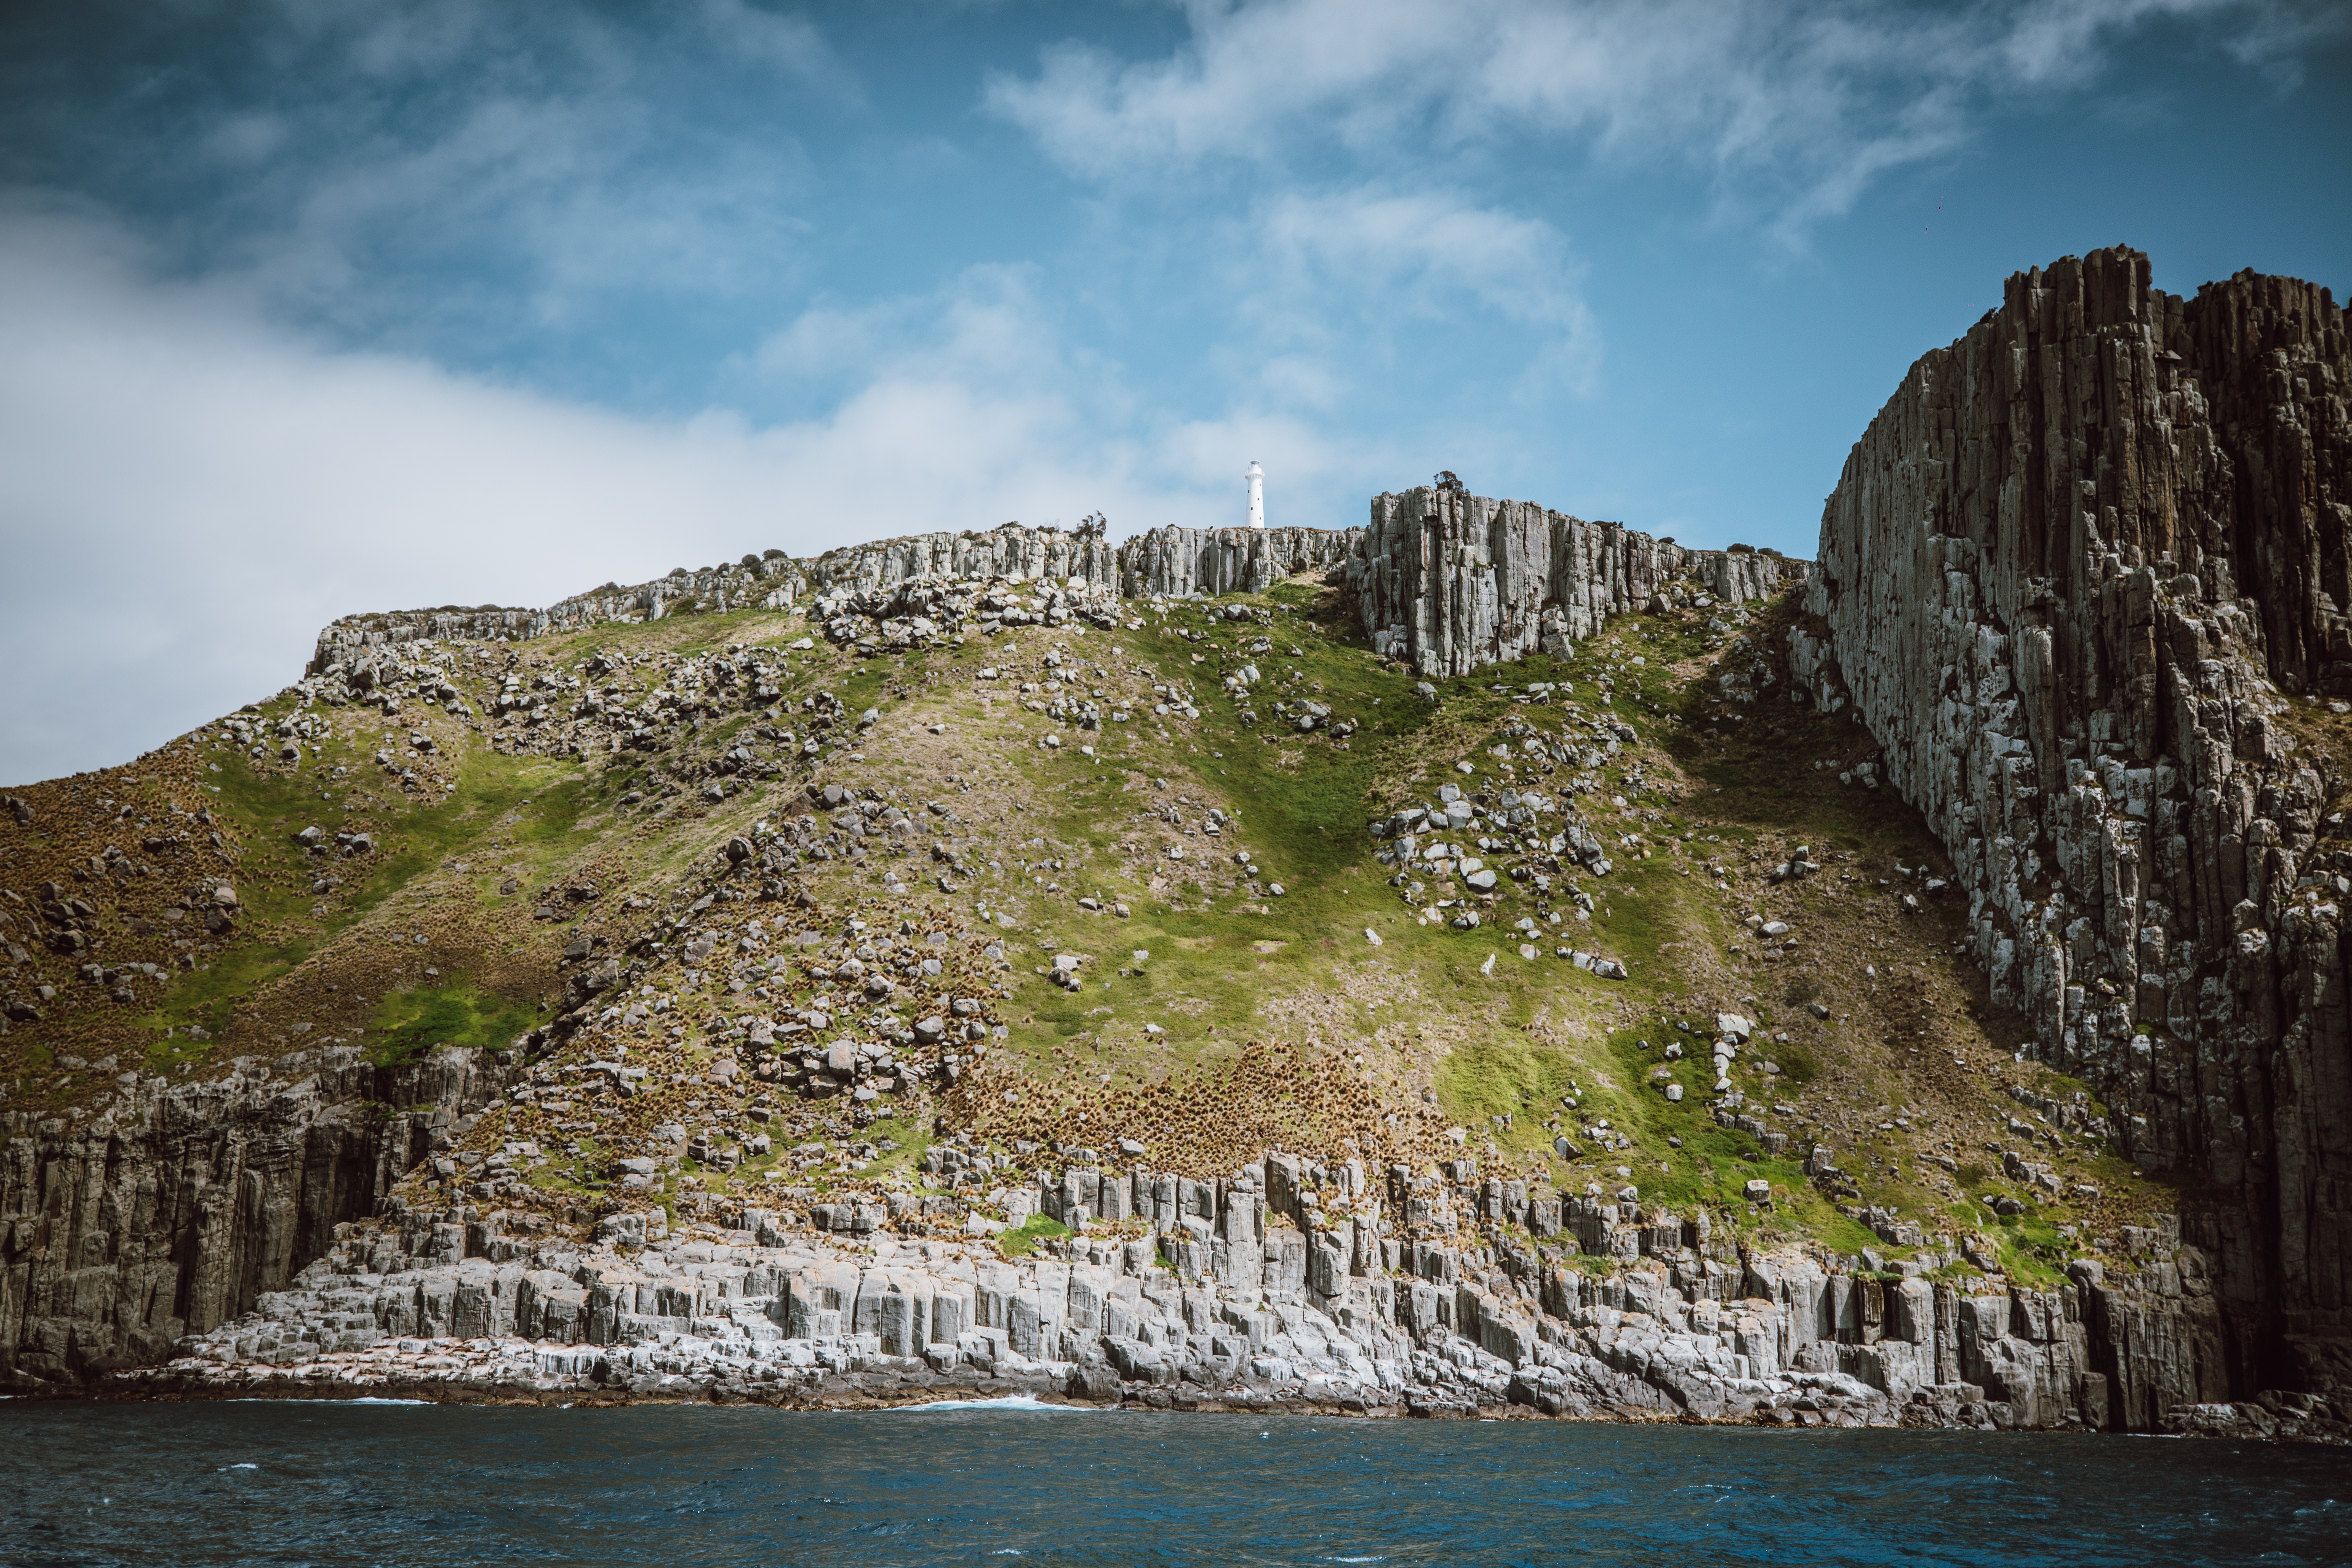
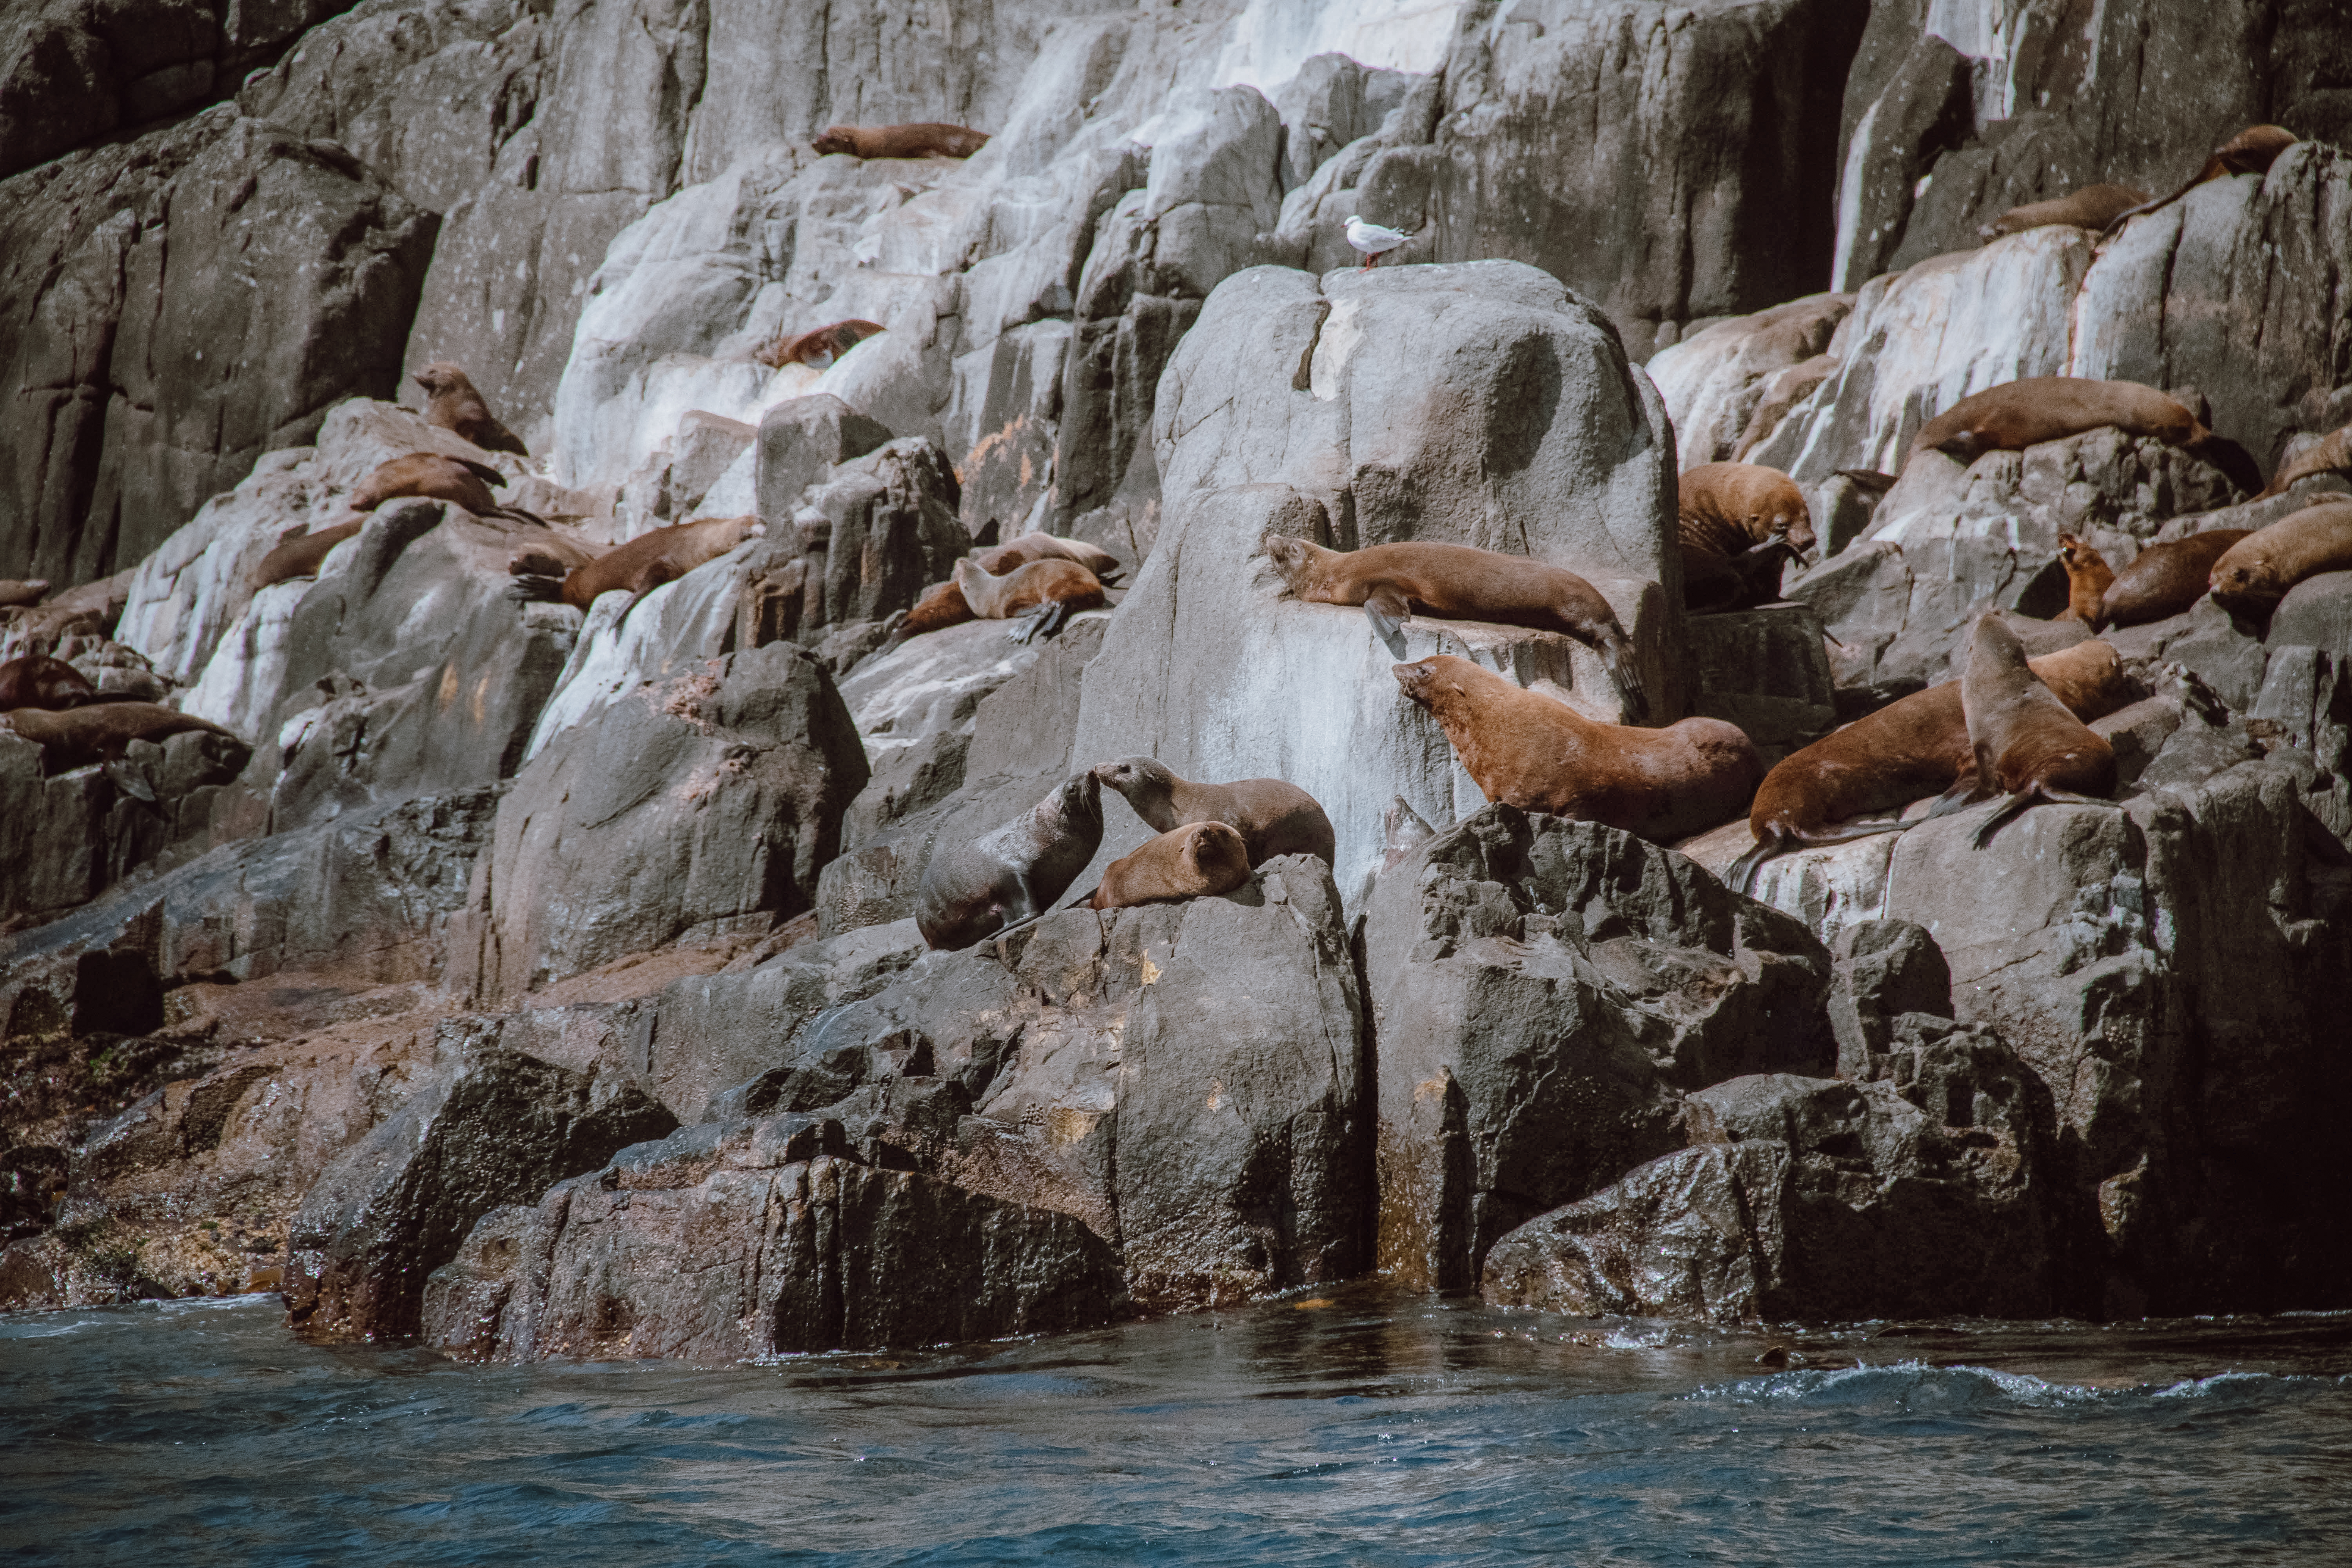
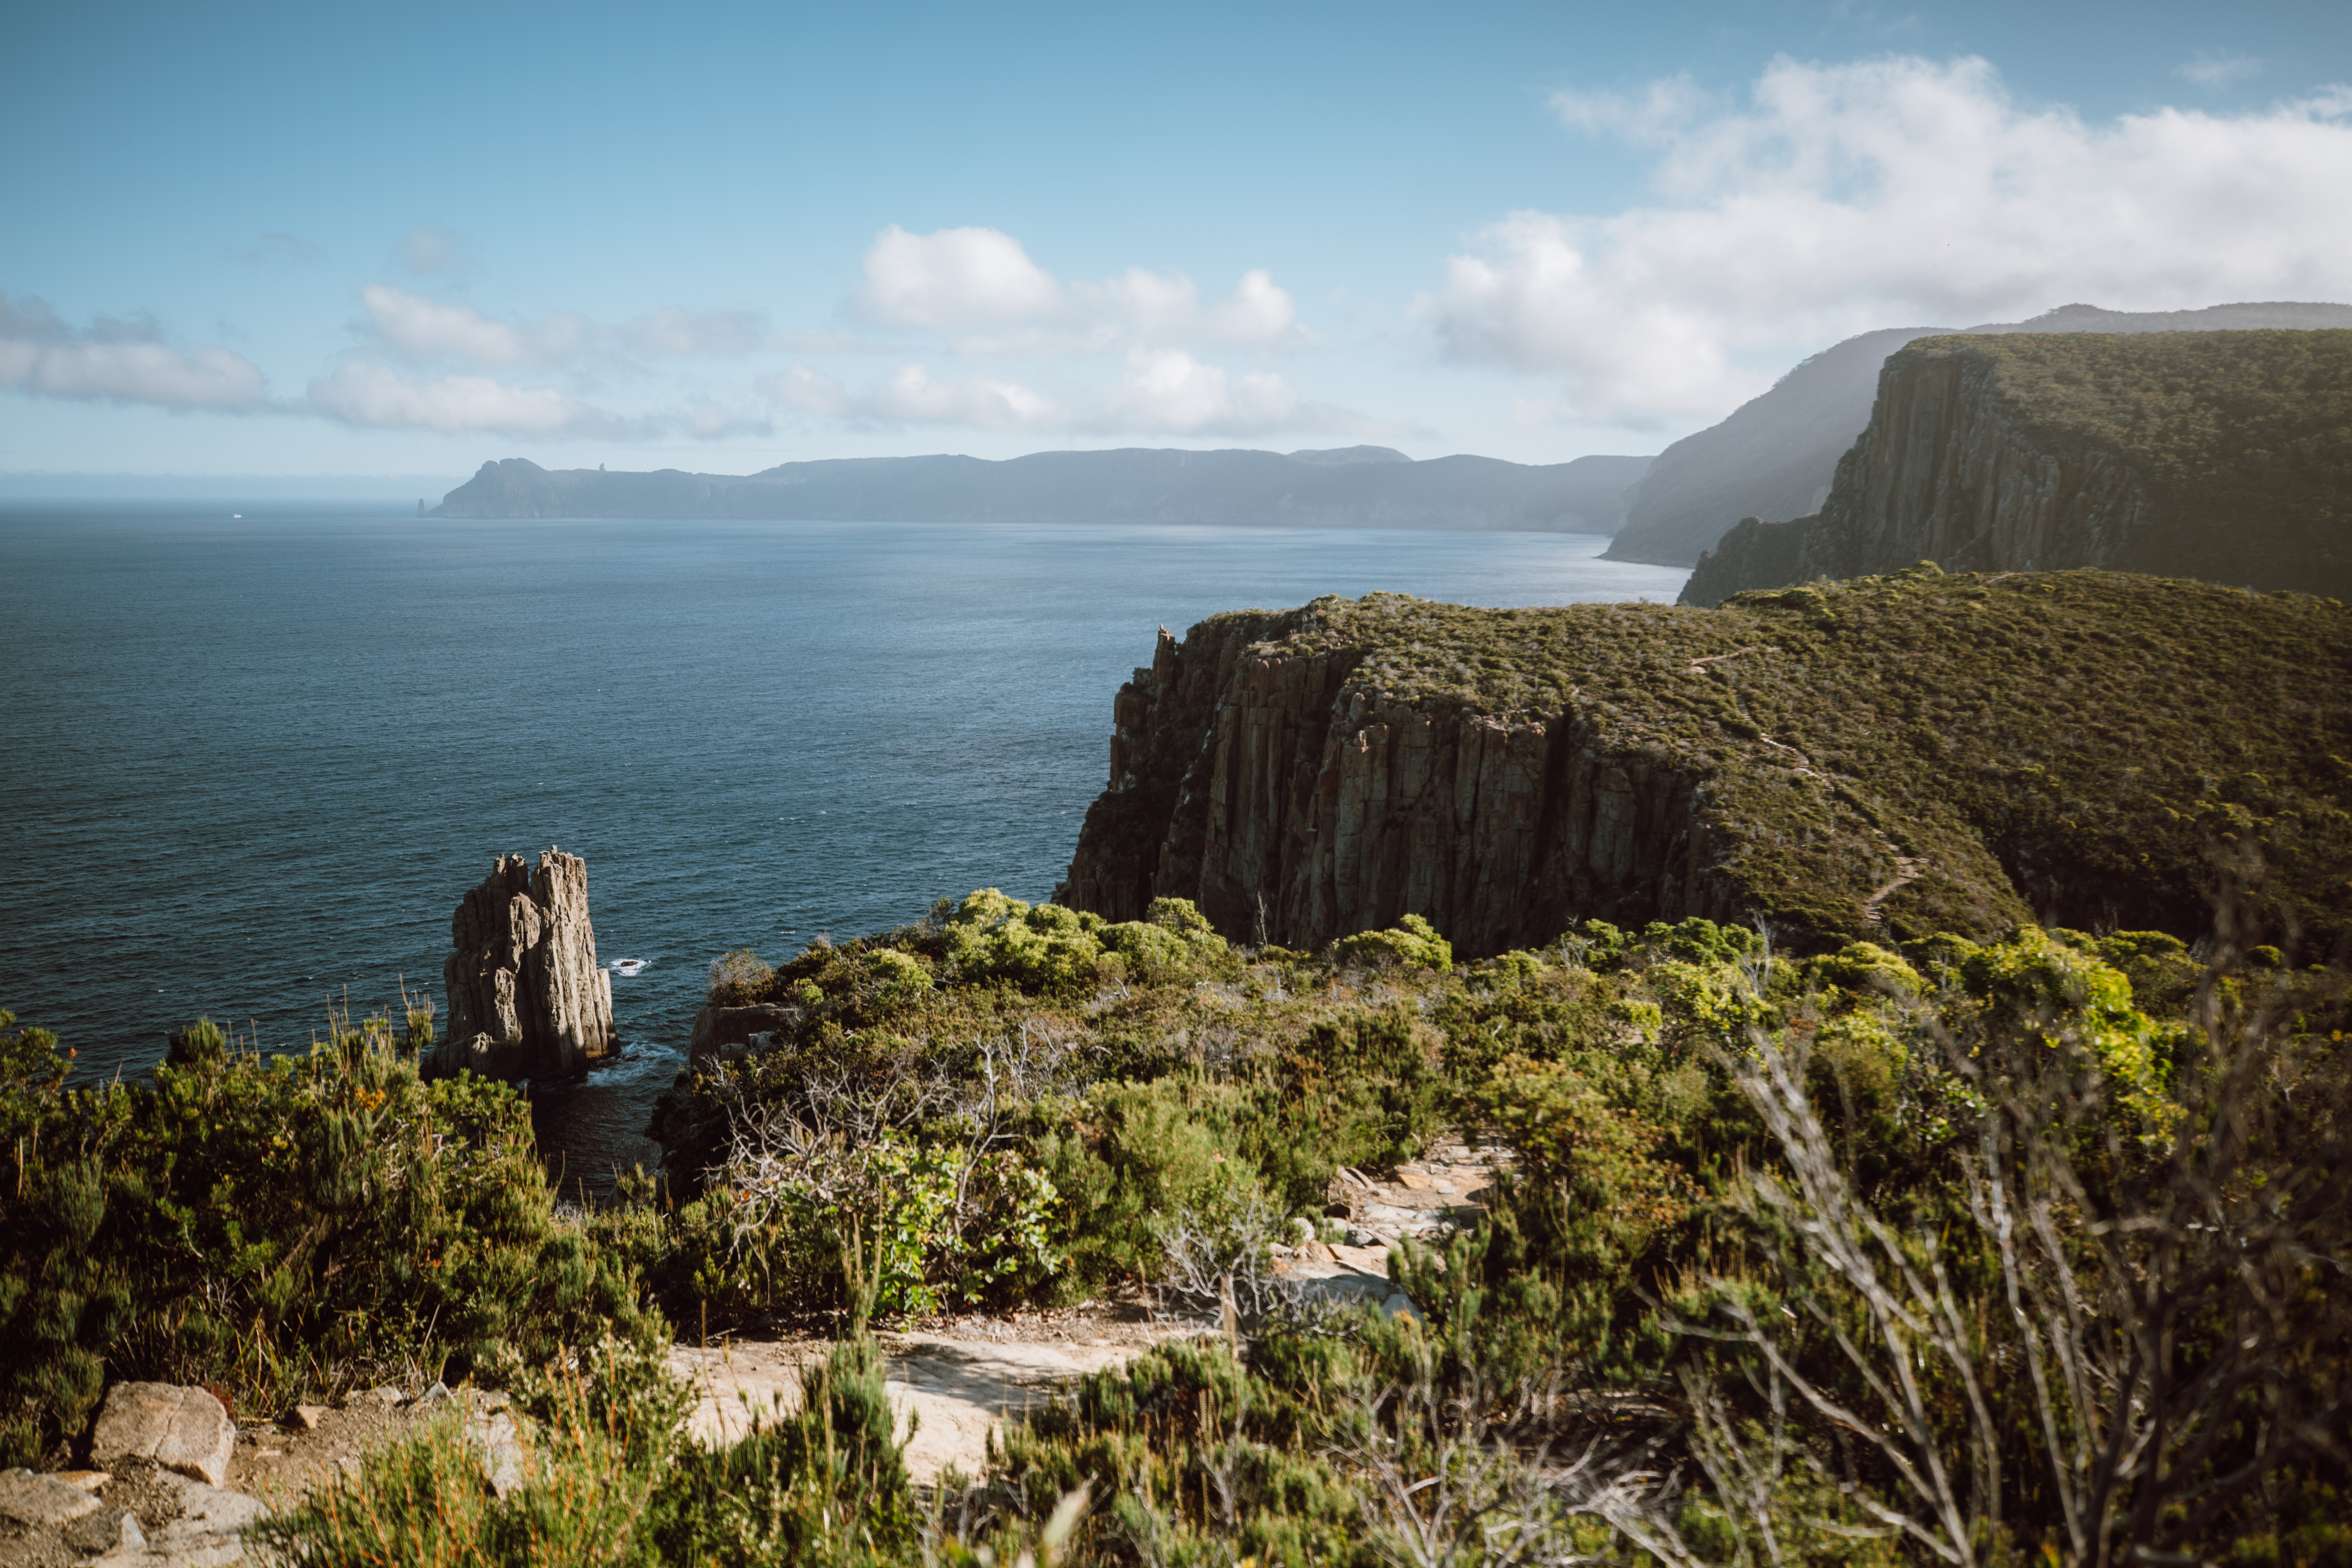
We booked ourselves on the 10am Pennicott Wilderness Journeys Tasman Tour (they also offer one at 13), and here we were able to see the highest vertical cliffs in the Southern Hemisphere as well as lots of marine wildlife, from seals to dolphins to albatrosses!
After lunch we decided to hike to Cape Hauy (which we saw from below on the boat) so that we could see the candlestick and the totem pole from above!
If you plan on doing this hike please be aware that you will need to drive along a dirt track for about 15 minutes to reach the car park, and that the hike takes around 4 hours return.
We were also thinking of doing the hike to Cape Raoul but this one takes around 5 hours and we didn’t have much time left before sun down.
DAY 5 – TASMAN PENINSULA
We were torn between seeing the Tasmanian Devils at the unzoo and Port Arthur Historical site (due to our limited budget we couldn’t do both) but decided to spend the morning at the unzoo.
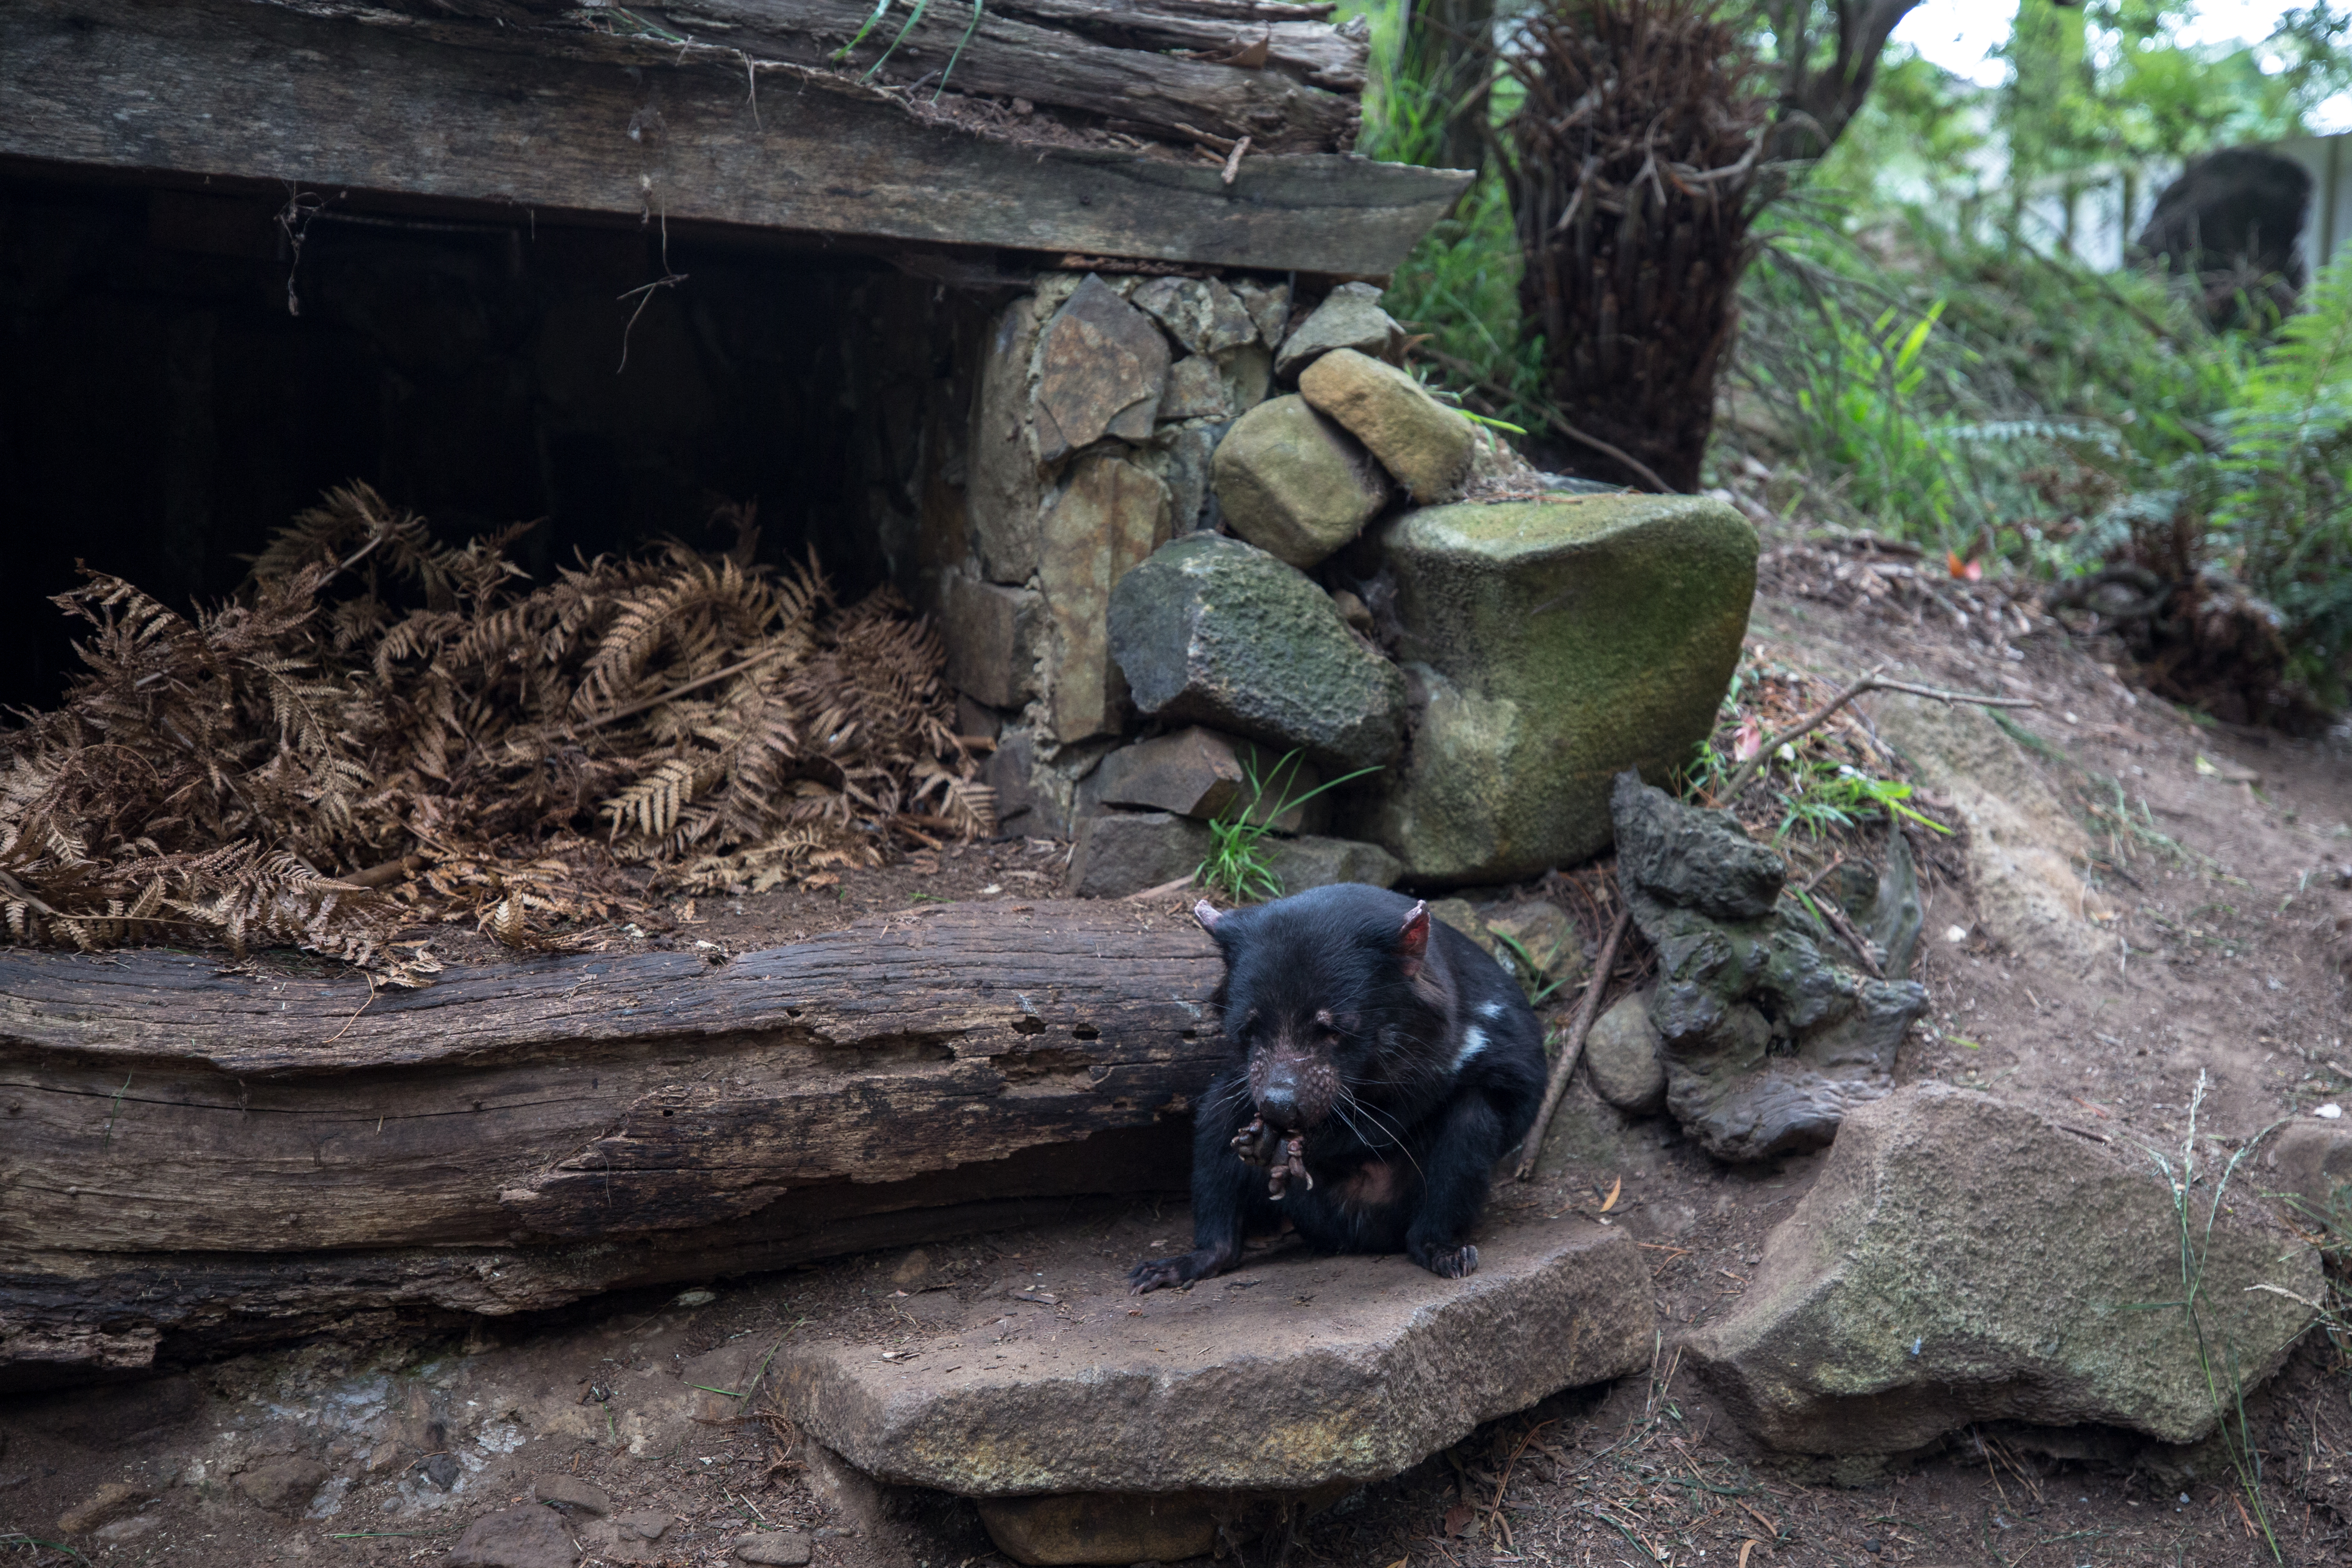
The unzoo was an amazing experience where we were able to see the Tasmanian Devils being fed and also napping! You may or may not know that over recent years the Tasmanian Devil population has decreased by 90% due to a contagious face cancer. Fortunately they have been able to stop the disease from reaching the Peninsula, so it is vital that they help the local population there.
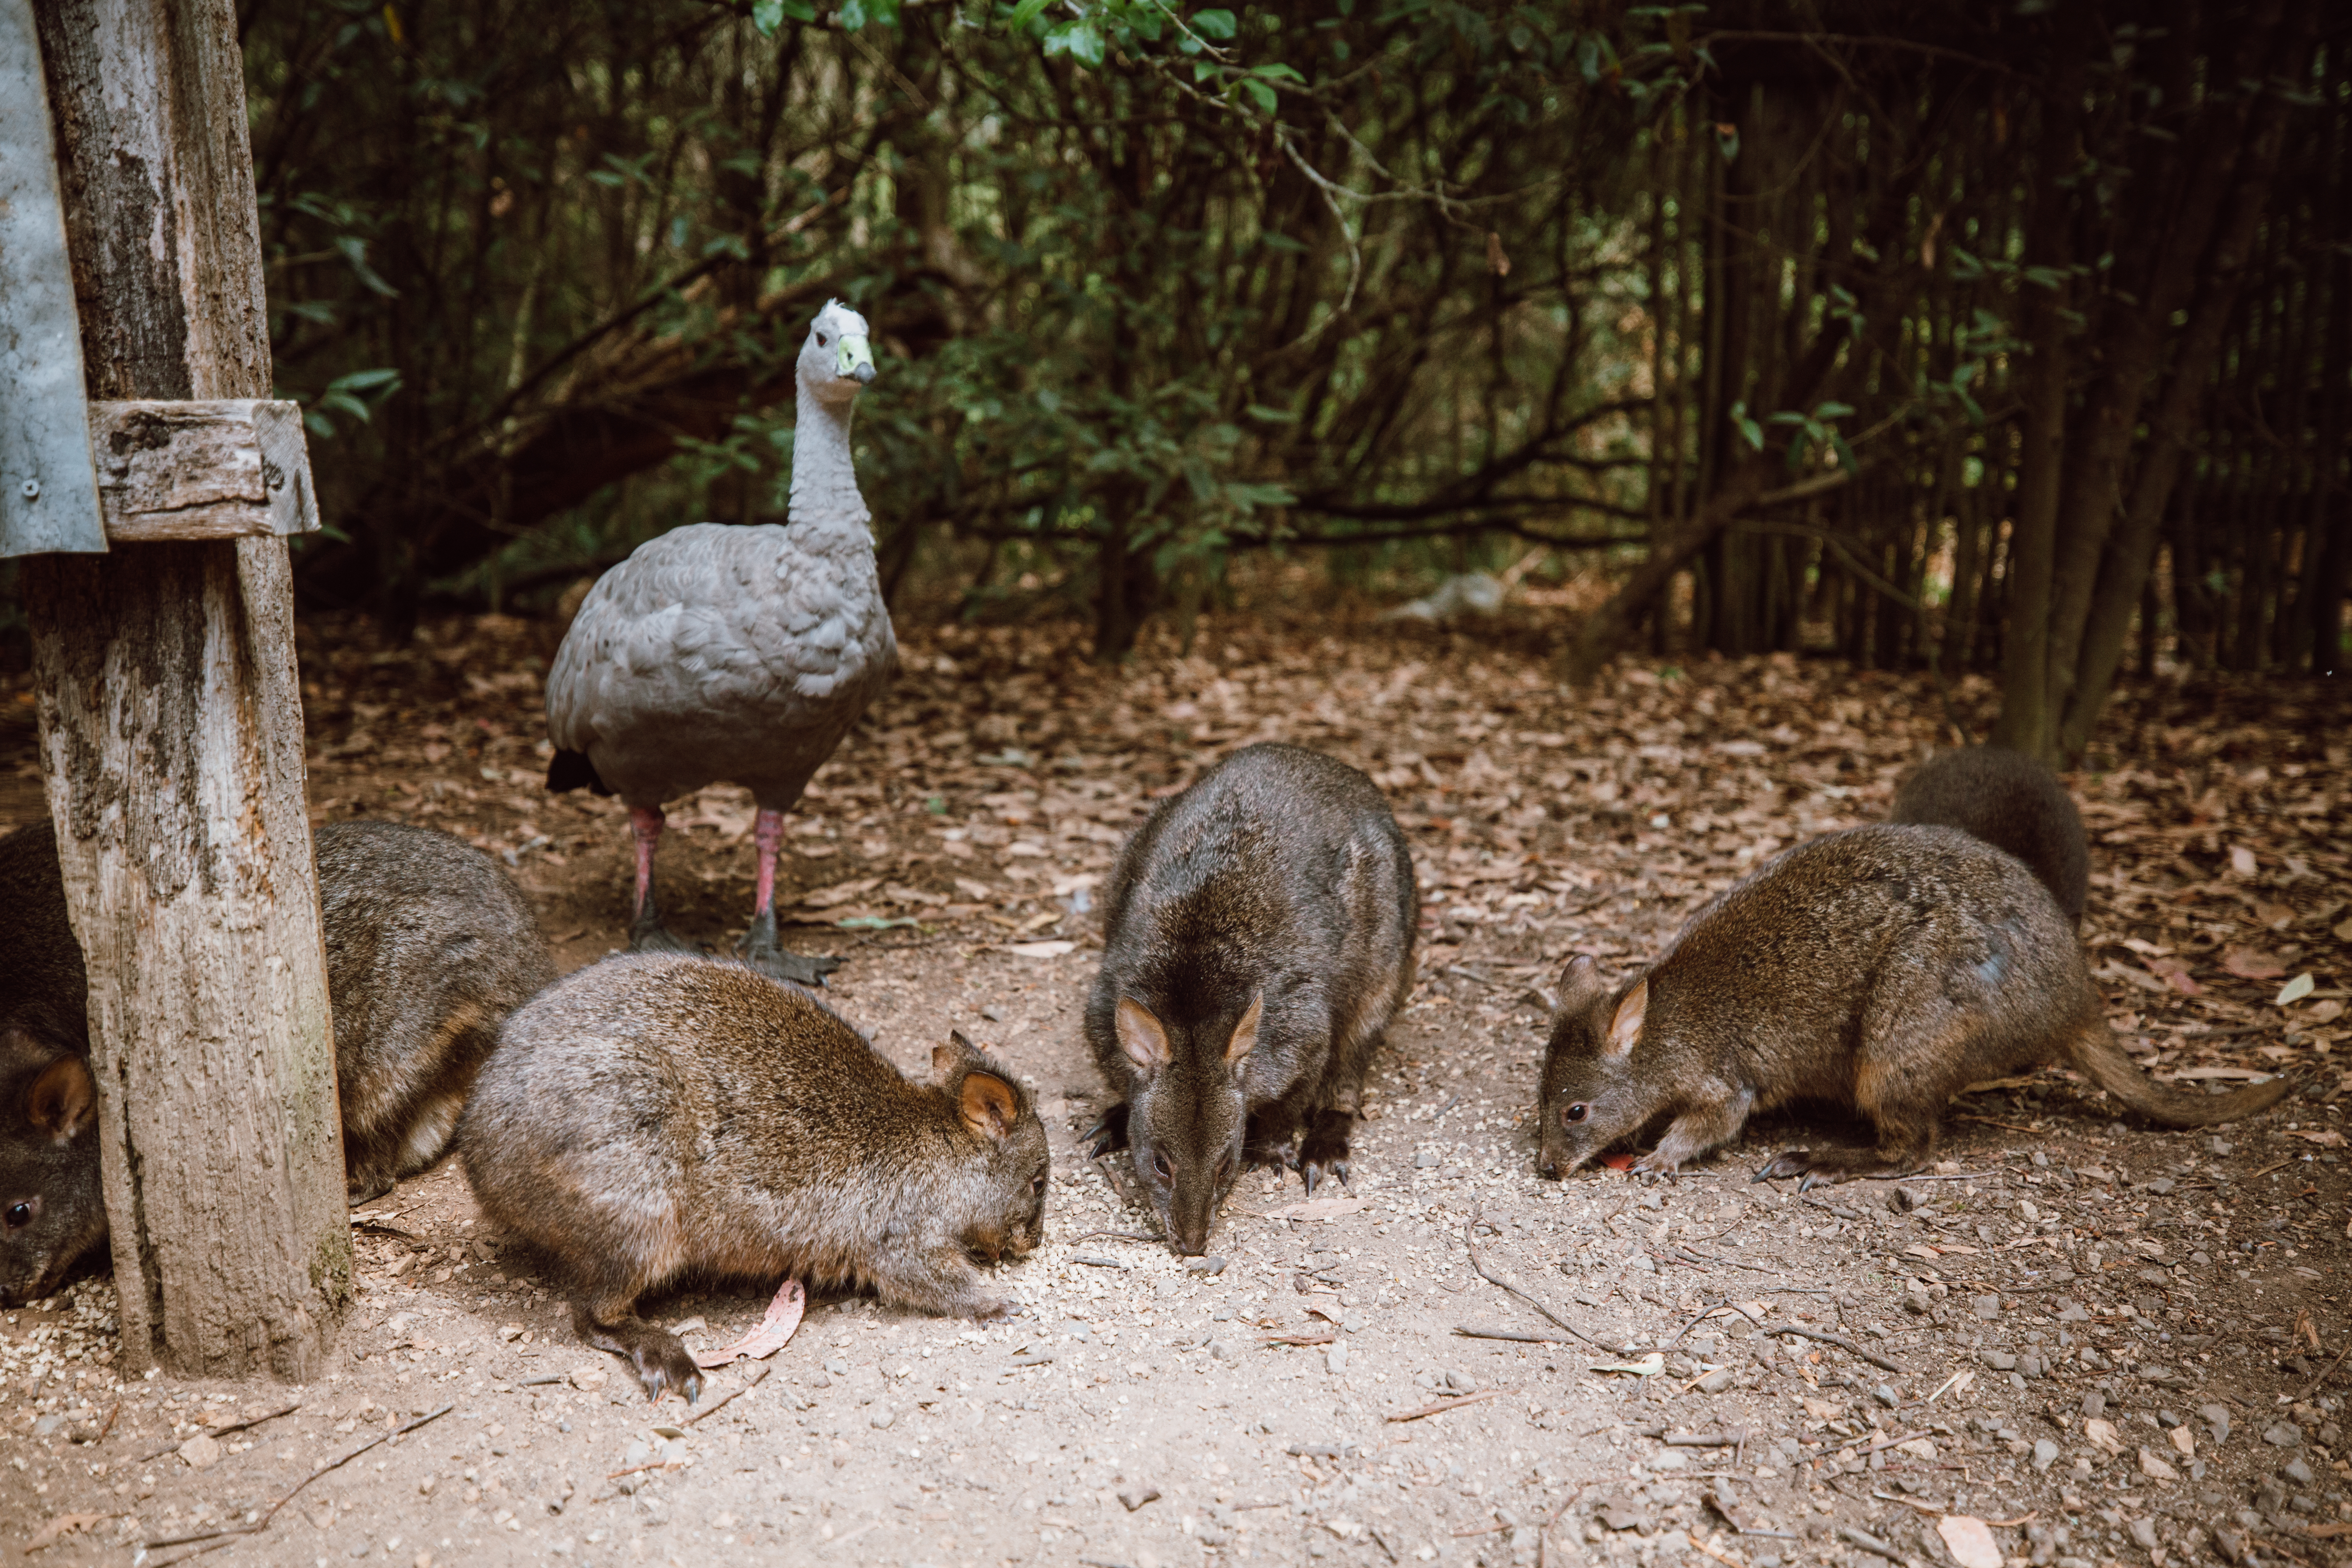
The Unzoo also had a talk about the local wildlife where 2 wild baron geese (the only birds able to drink salt water!) joined us as well as a kangaroo and pademelon feeding.
If you have some time in Port Arthur you might also want to consider visiting the remarkable cave and the Port Arthur Historical site, as well as going on several hikes.
We then spent the afternoon driving 4.5 hours north west to Cradle Mountain. Unless you plan on camping, accommodation isn’t cheap in Cradle Mountain as there isn’t much choice. We stayed 3 nights at the Cradle Mountain Discovery Parks.
DAY 6 – CRADLE MOUNTAIN
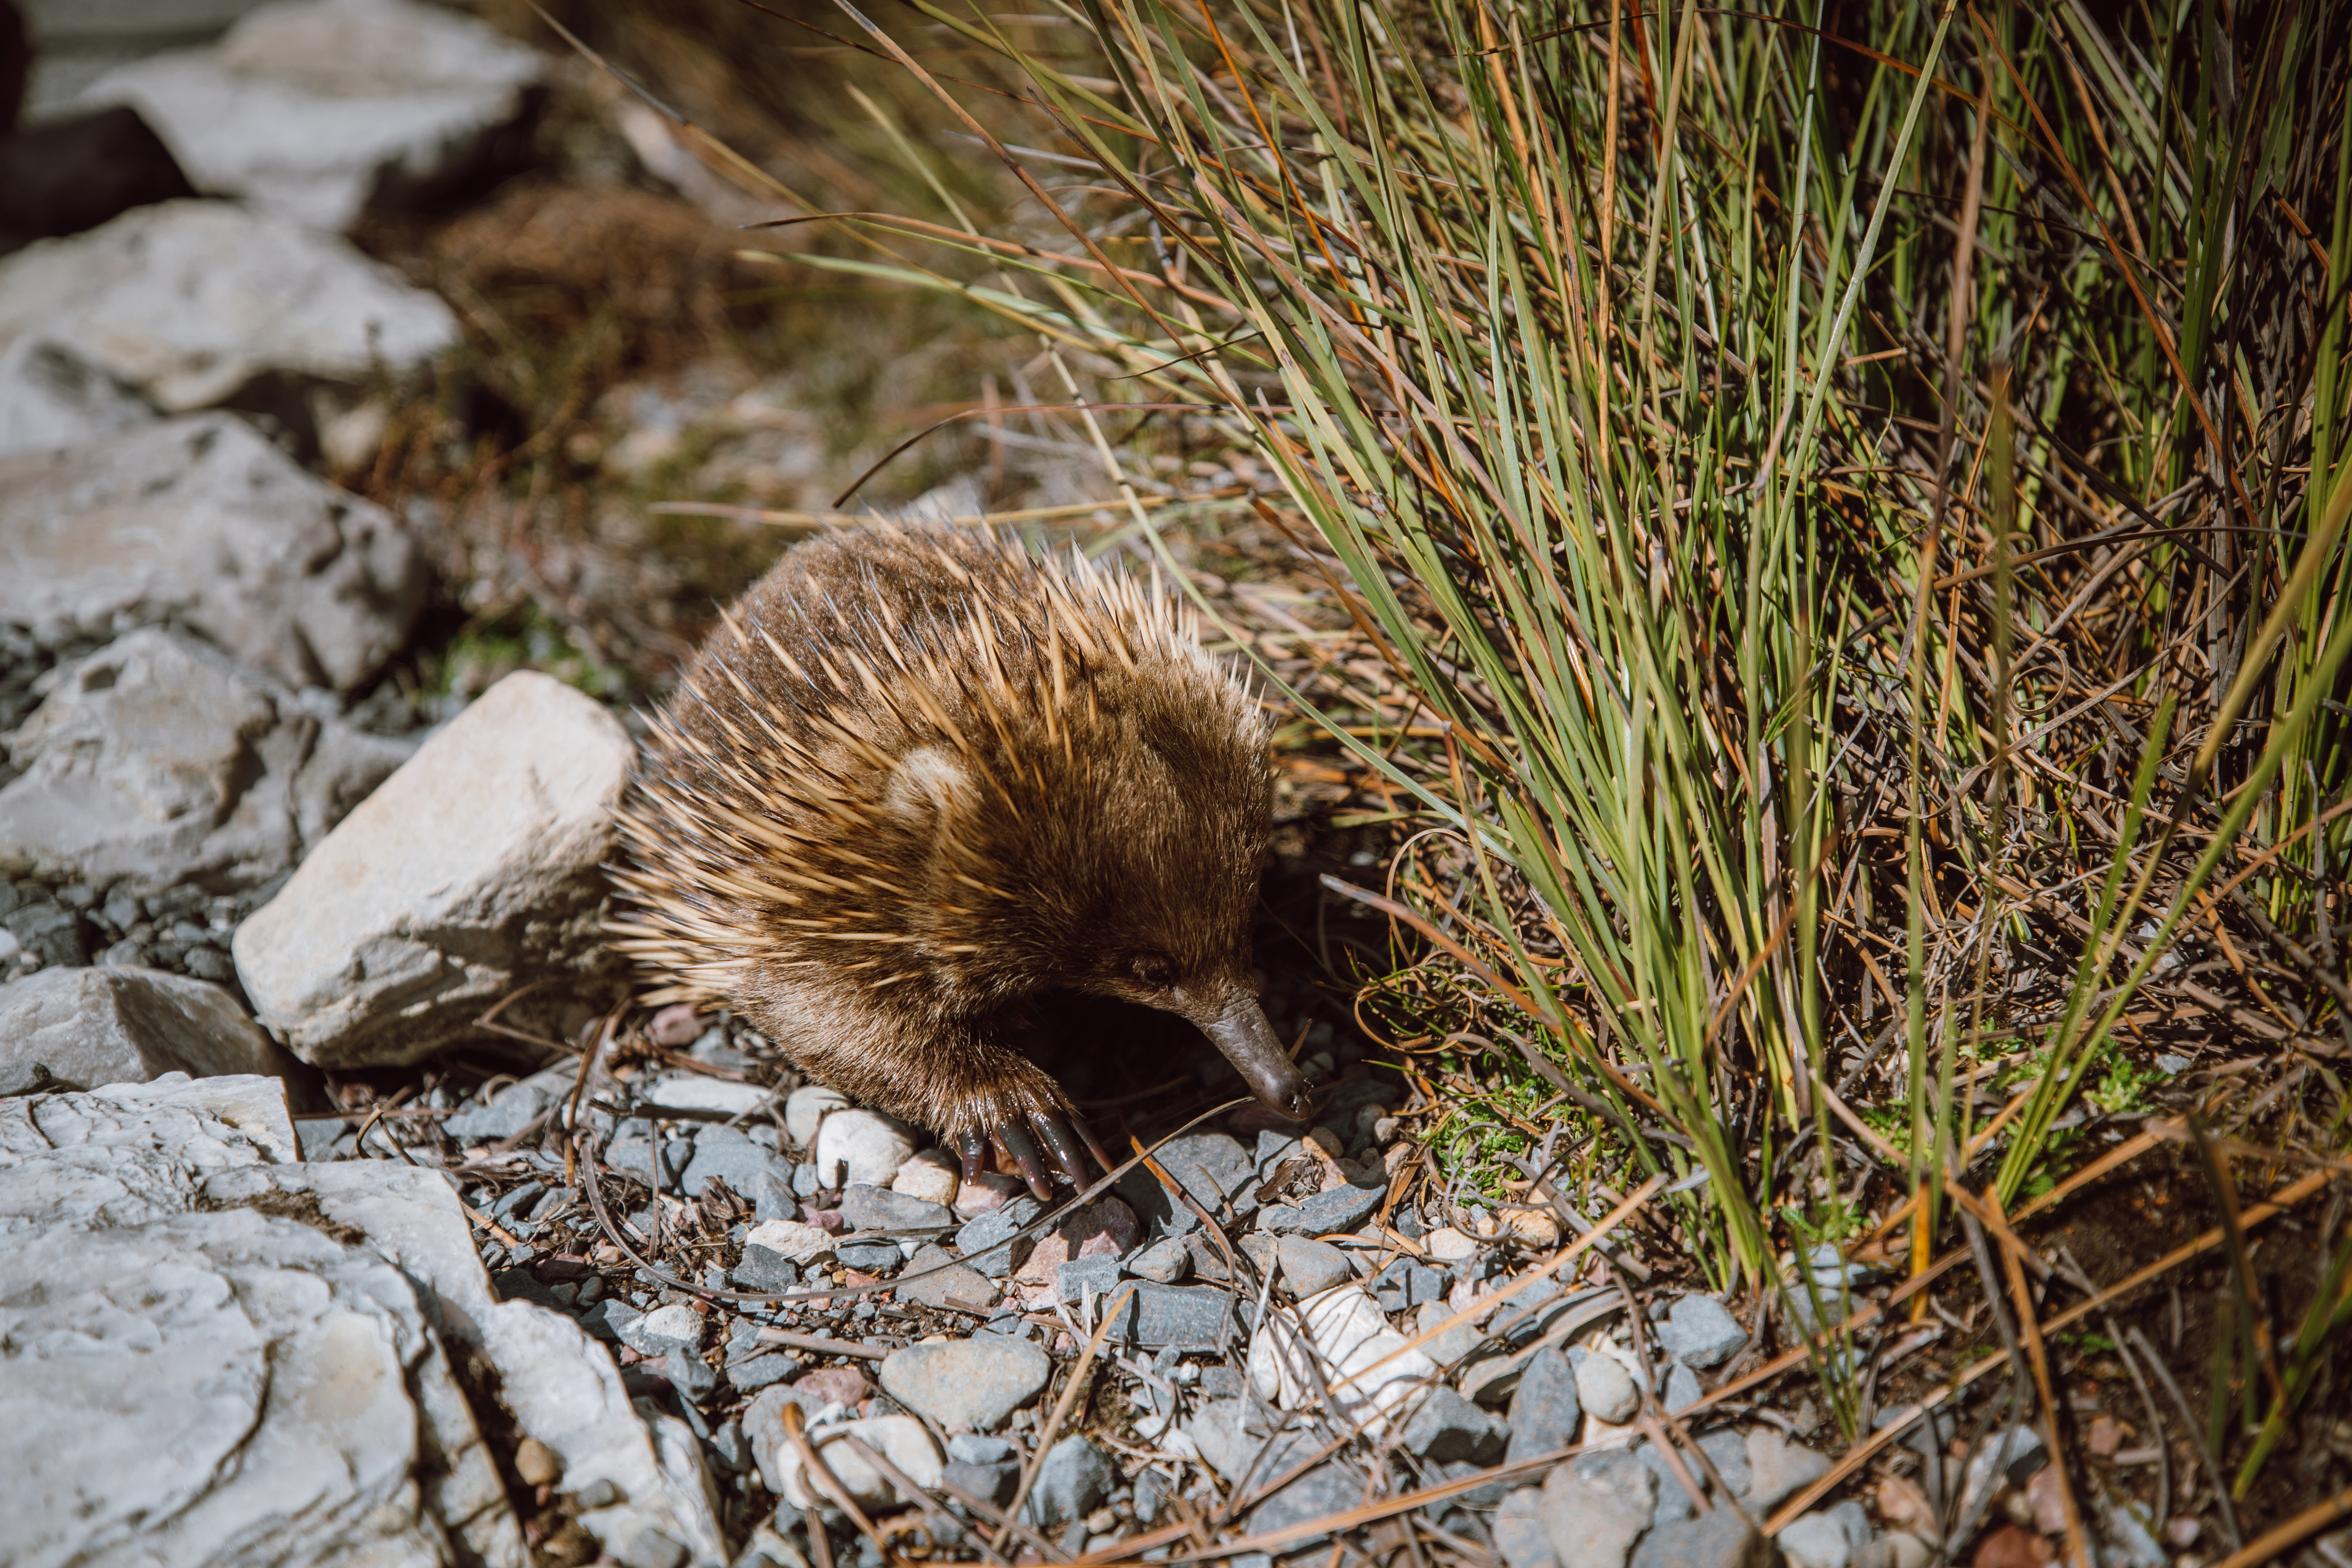
As we had 2.5 days to enjoy Cradle Mountain we decided to do the shorter and easier walk on the first day. This 6 km walk takes you on a loop of Dove Lake, if you don’t stop it will take you about 1.5 hours.
Keep you eyes peeled for local wildlife! We came across a cute echidna as well as a black red belly snake!
You will need to purchase a national park pass to enter Cradle Mountain – you can either do this online or at the visitor centre. If you wish to visit Cradle Mountain National Park between 8am-6:30pm you will need to take the free shuttle bus from the visitor centre.
We took the shuttle in for our walk and then drove in at 6:30pm to watch the sunset (please note that caravans / campervans are not allowed in at all)
DAY 7 – CRADLE MOUNTAIN
We started our day early (driving in at 7am) and were lucky enough to see the lake with zero wind and a crystal clear reflection of Cradle Mountain.
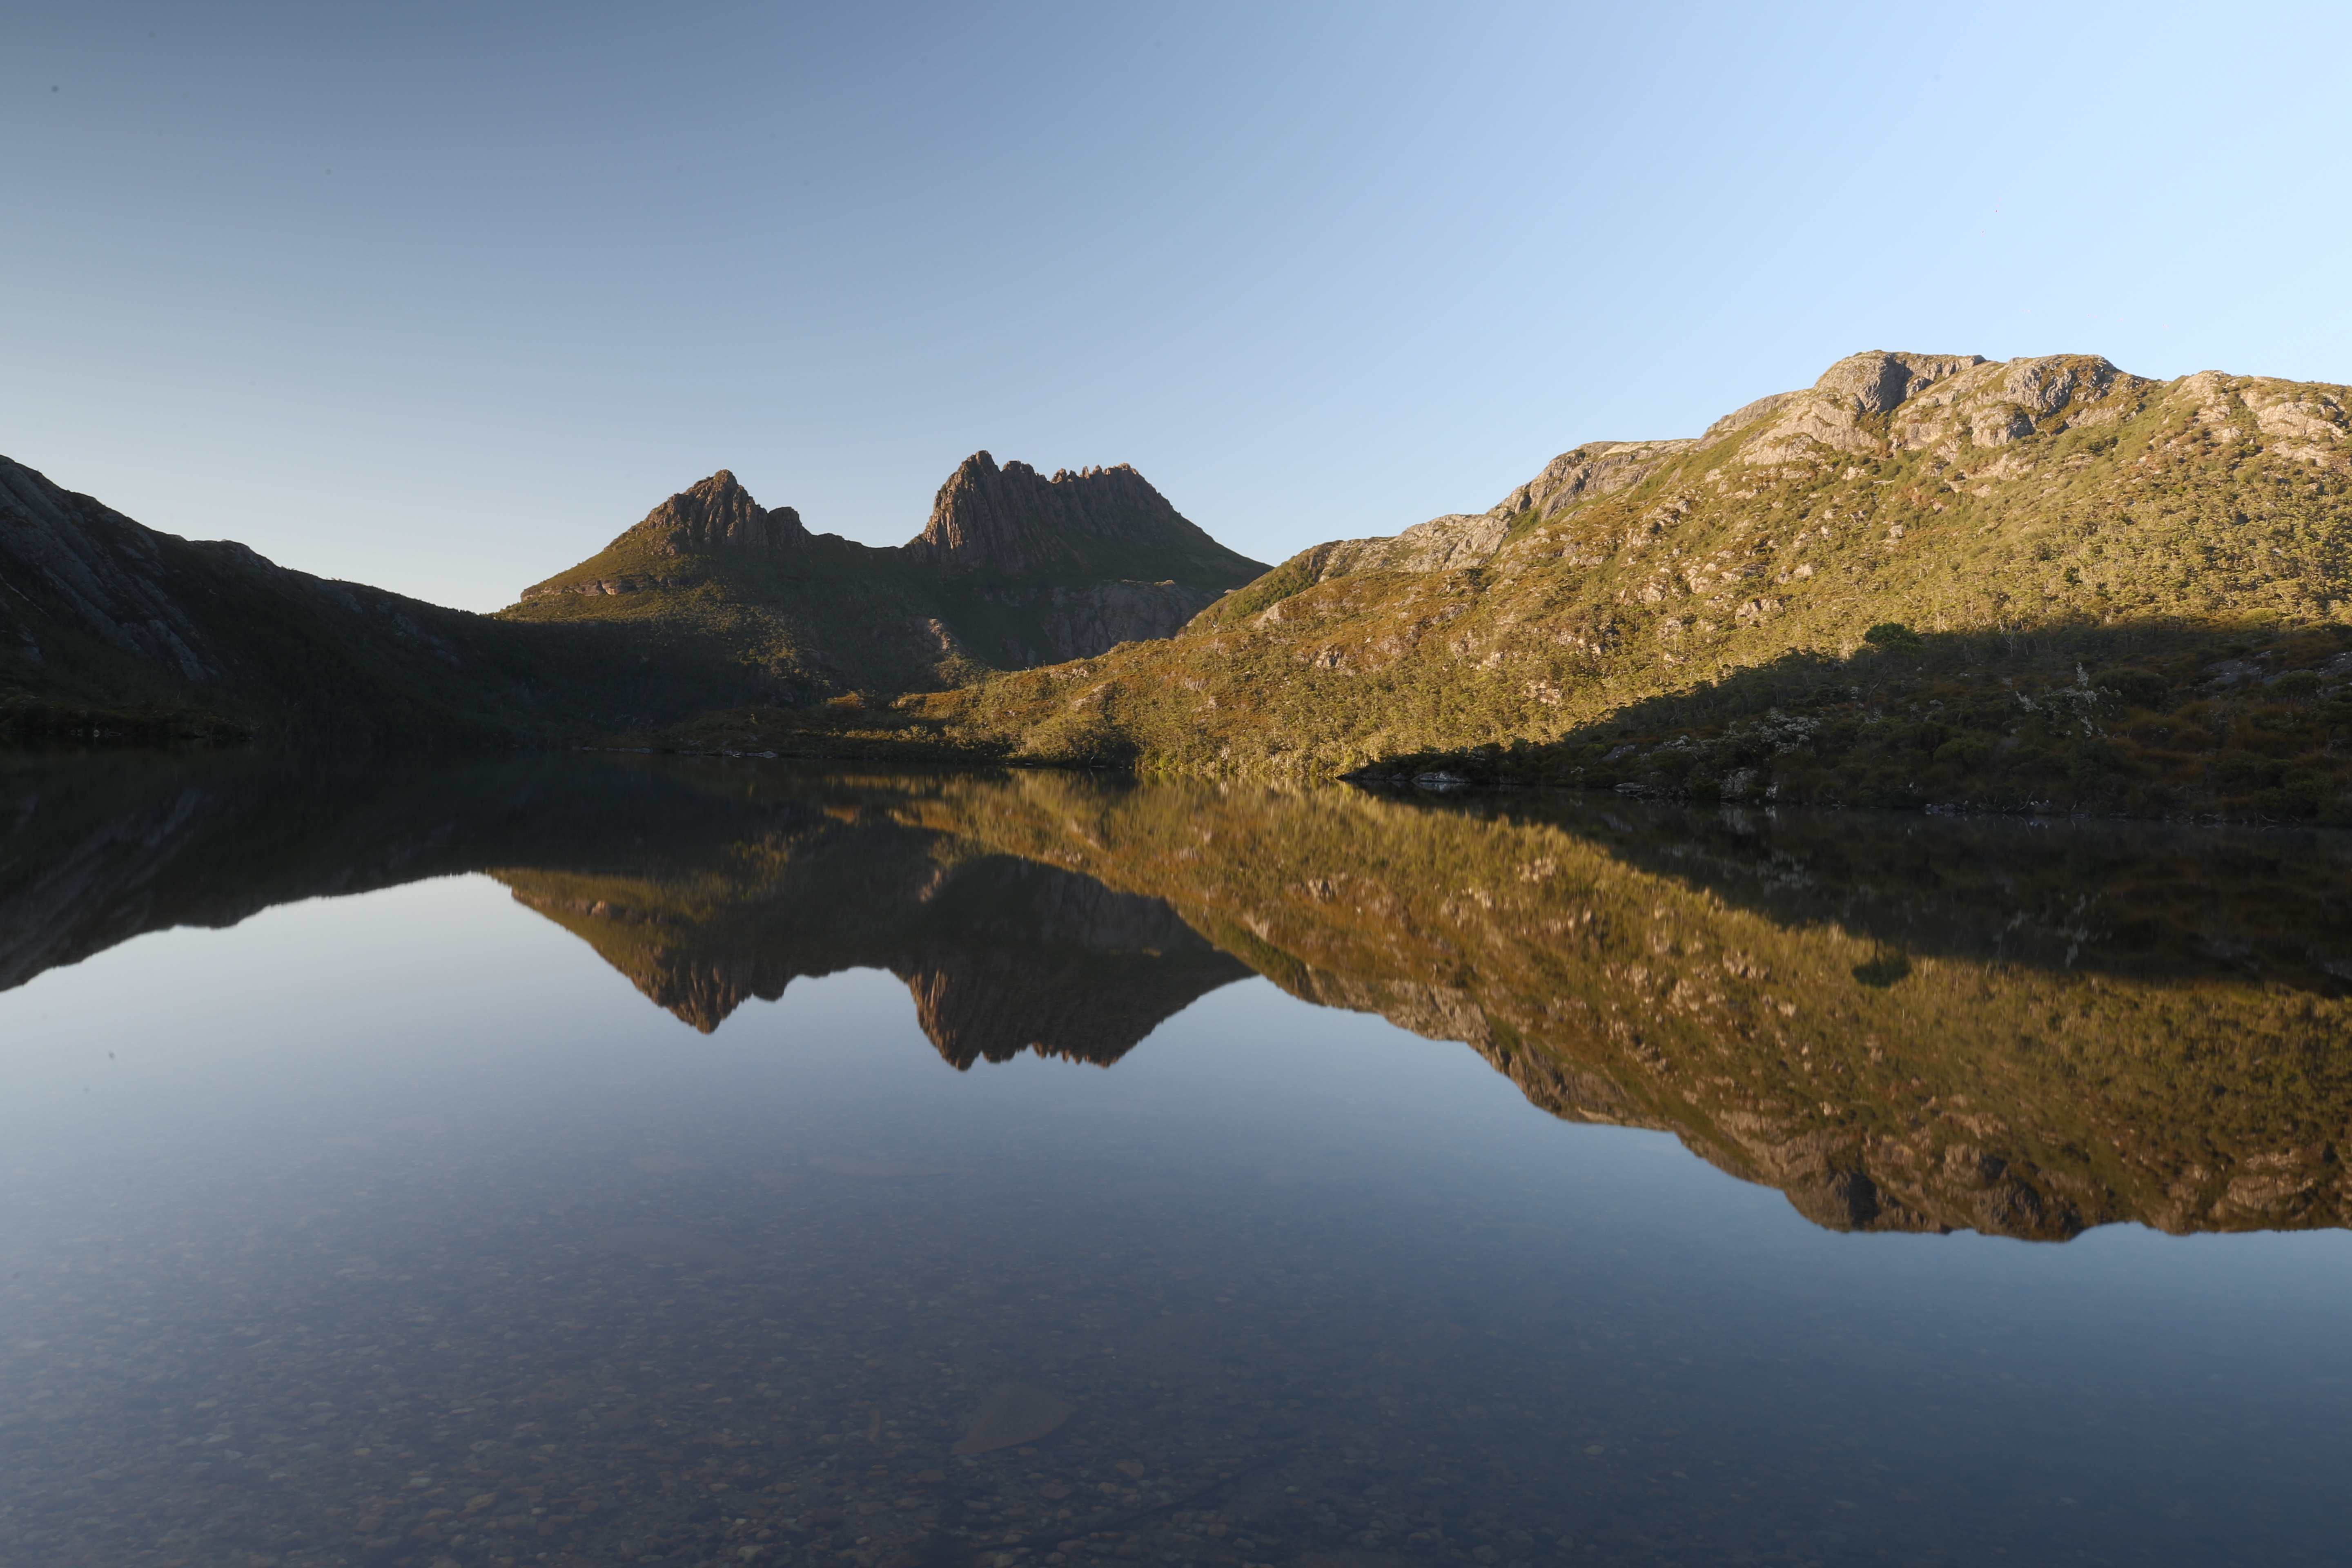
We began the hike up to Marion’s lookout, going past Wombat pool. The view from Marion’s lookout is beautiful and the climb up wasn’t as tough as I expected and only took an hour.
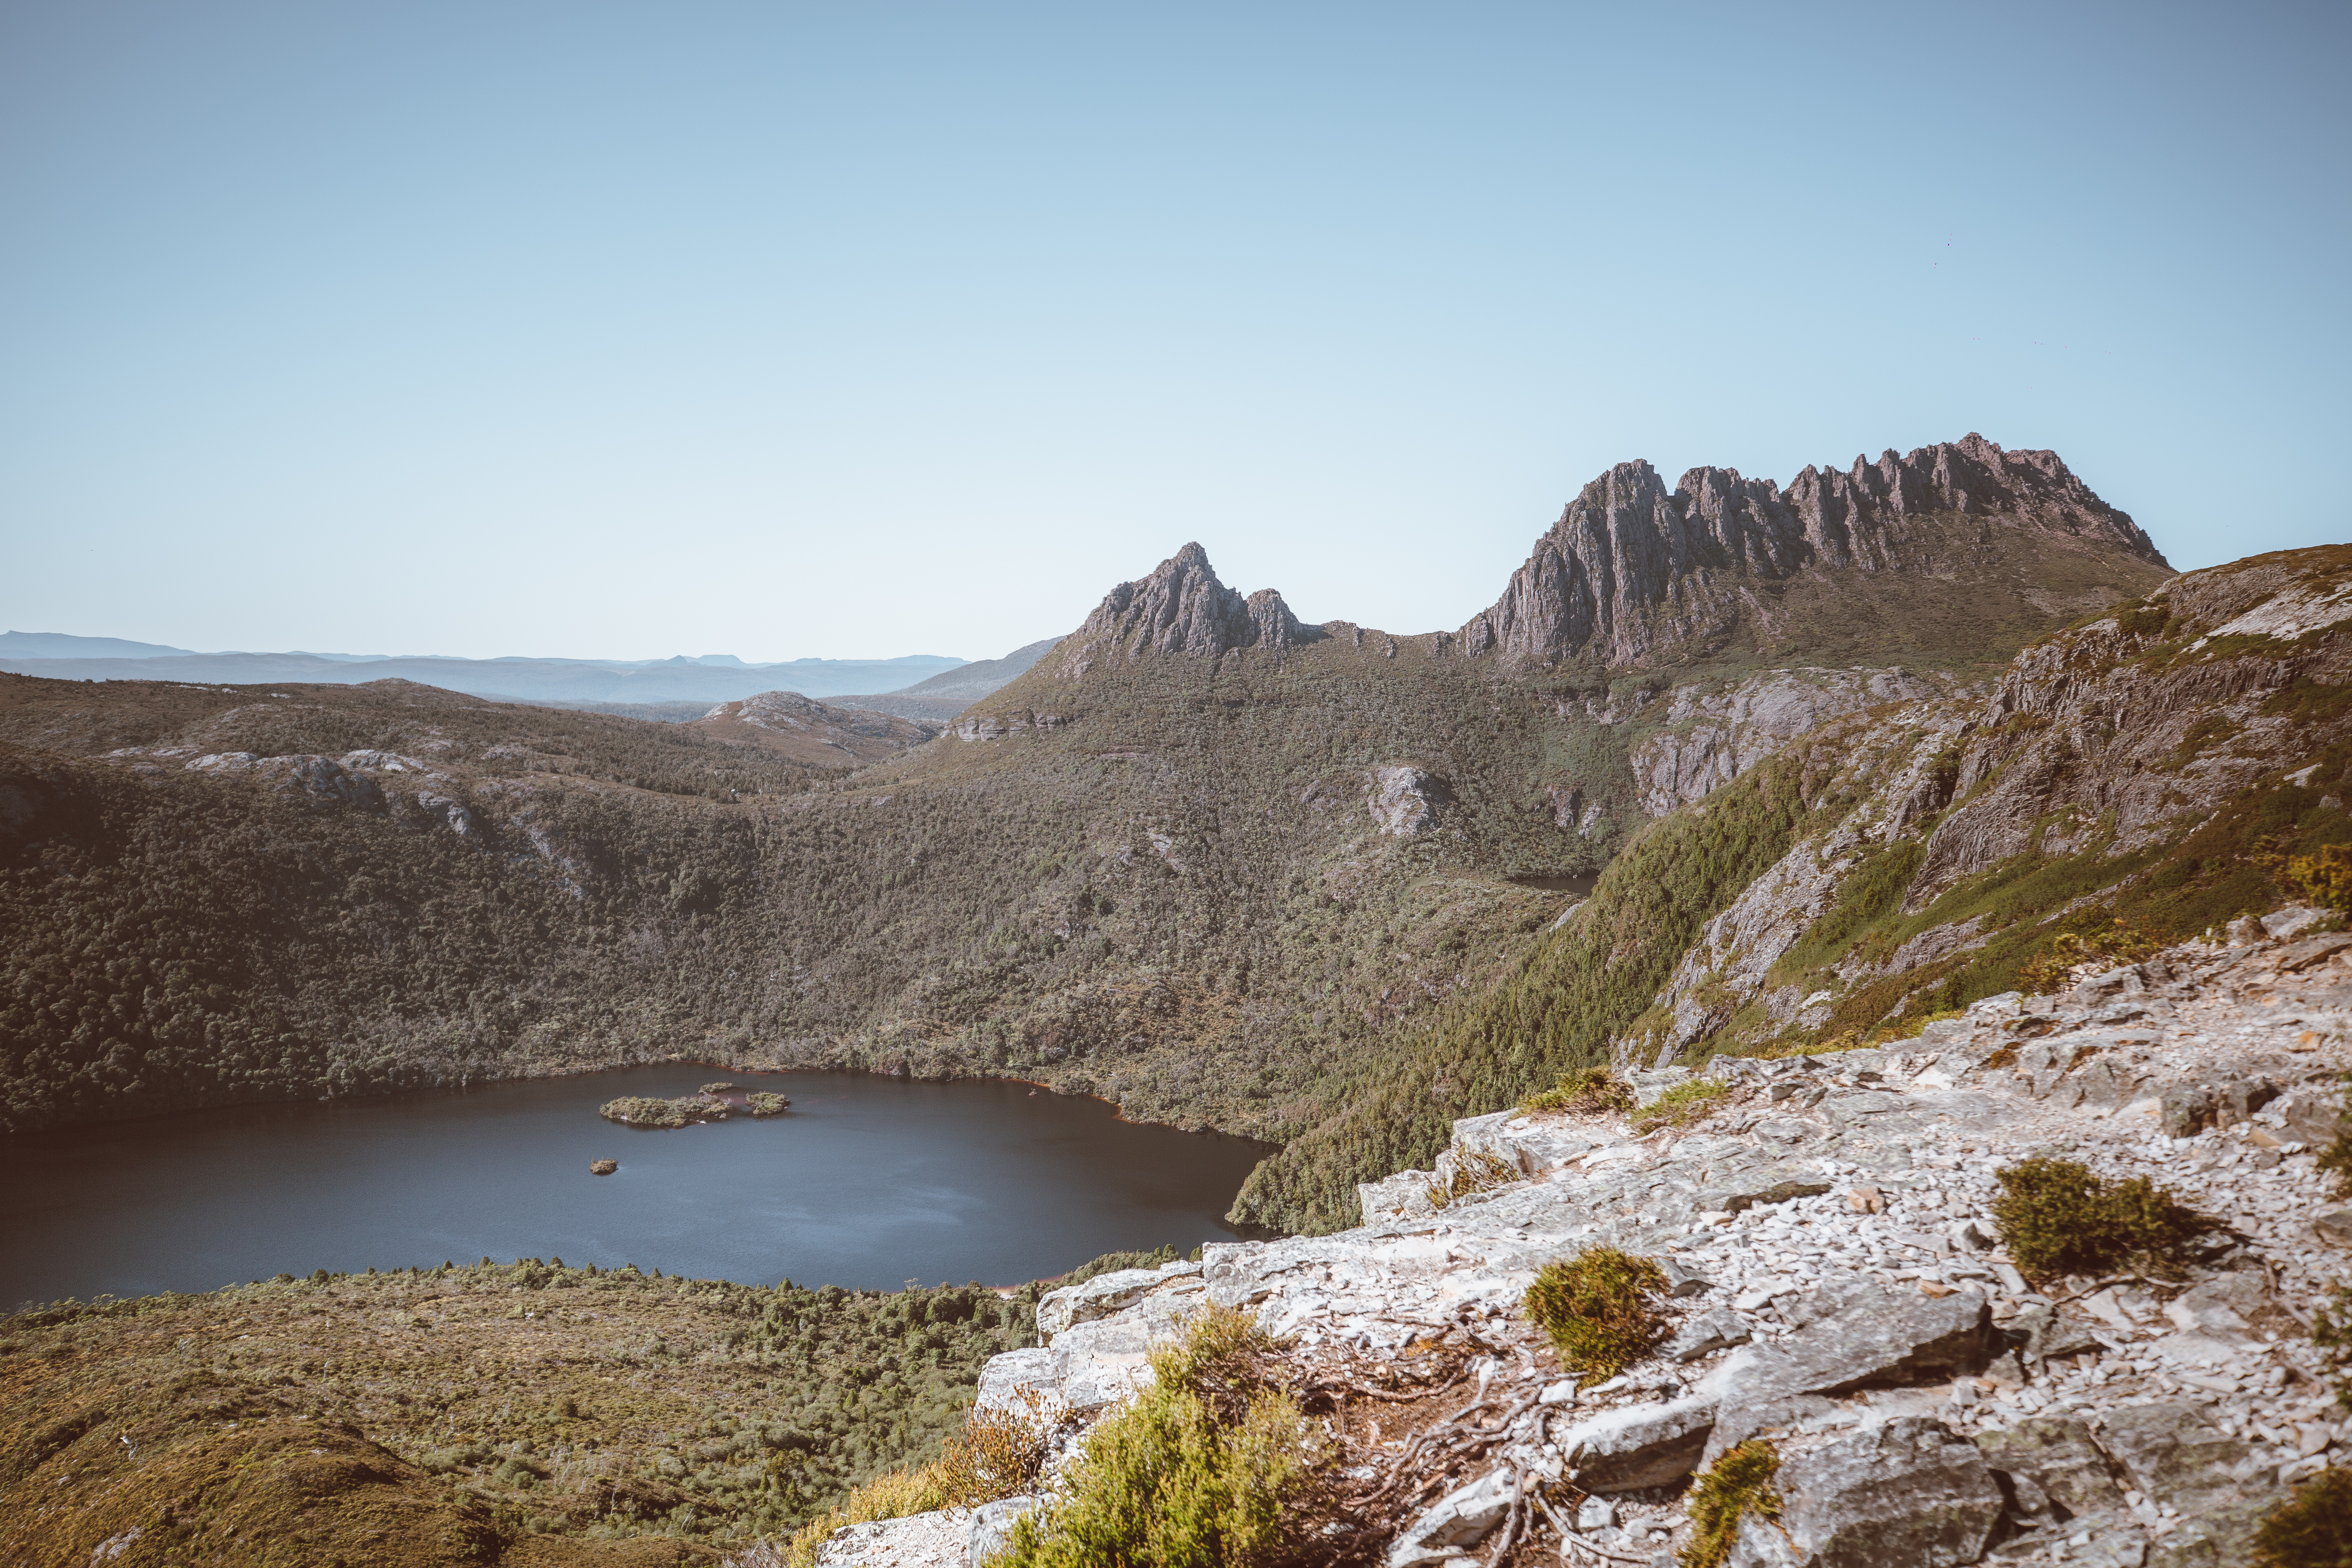
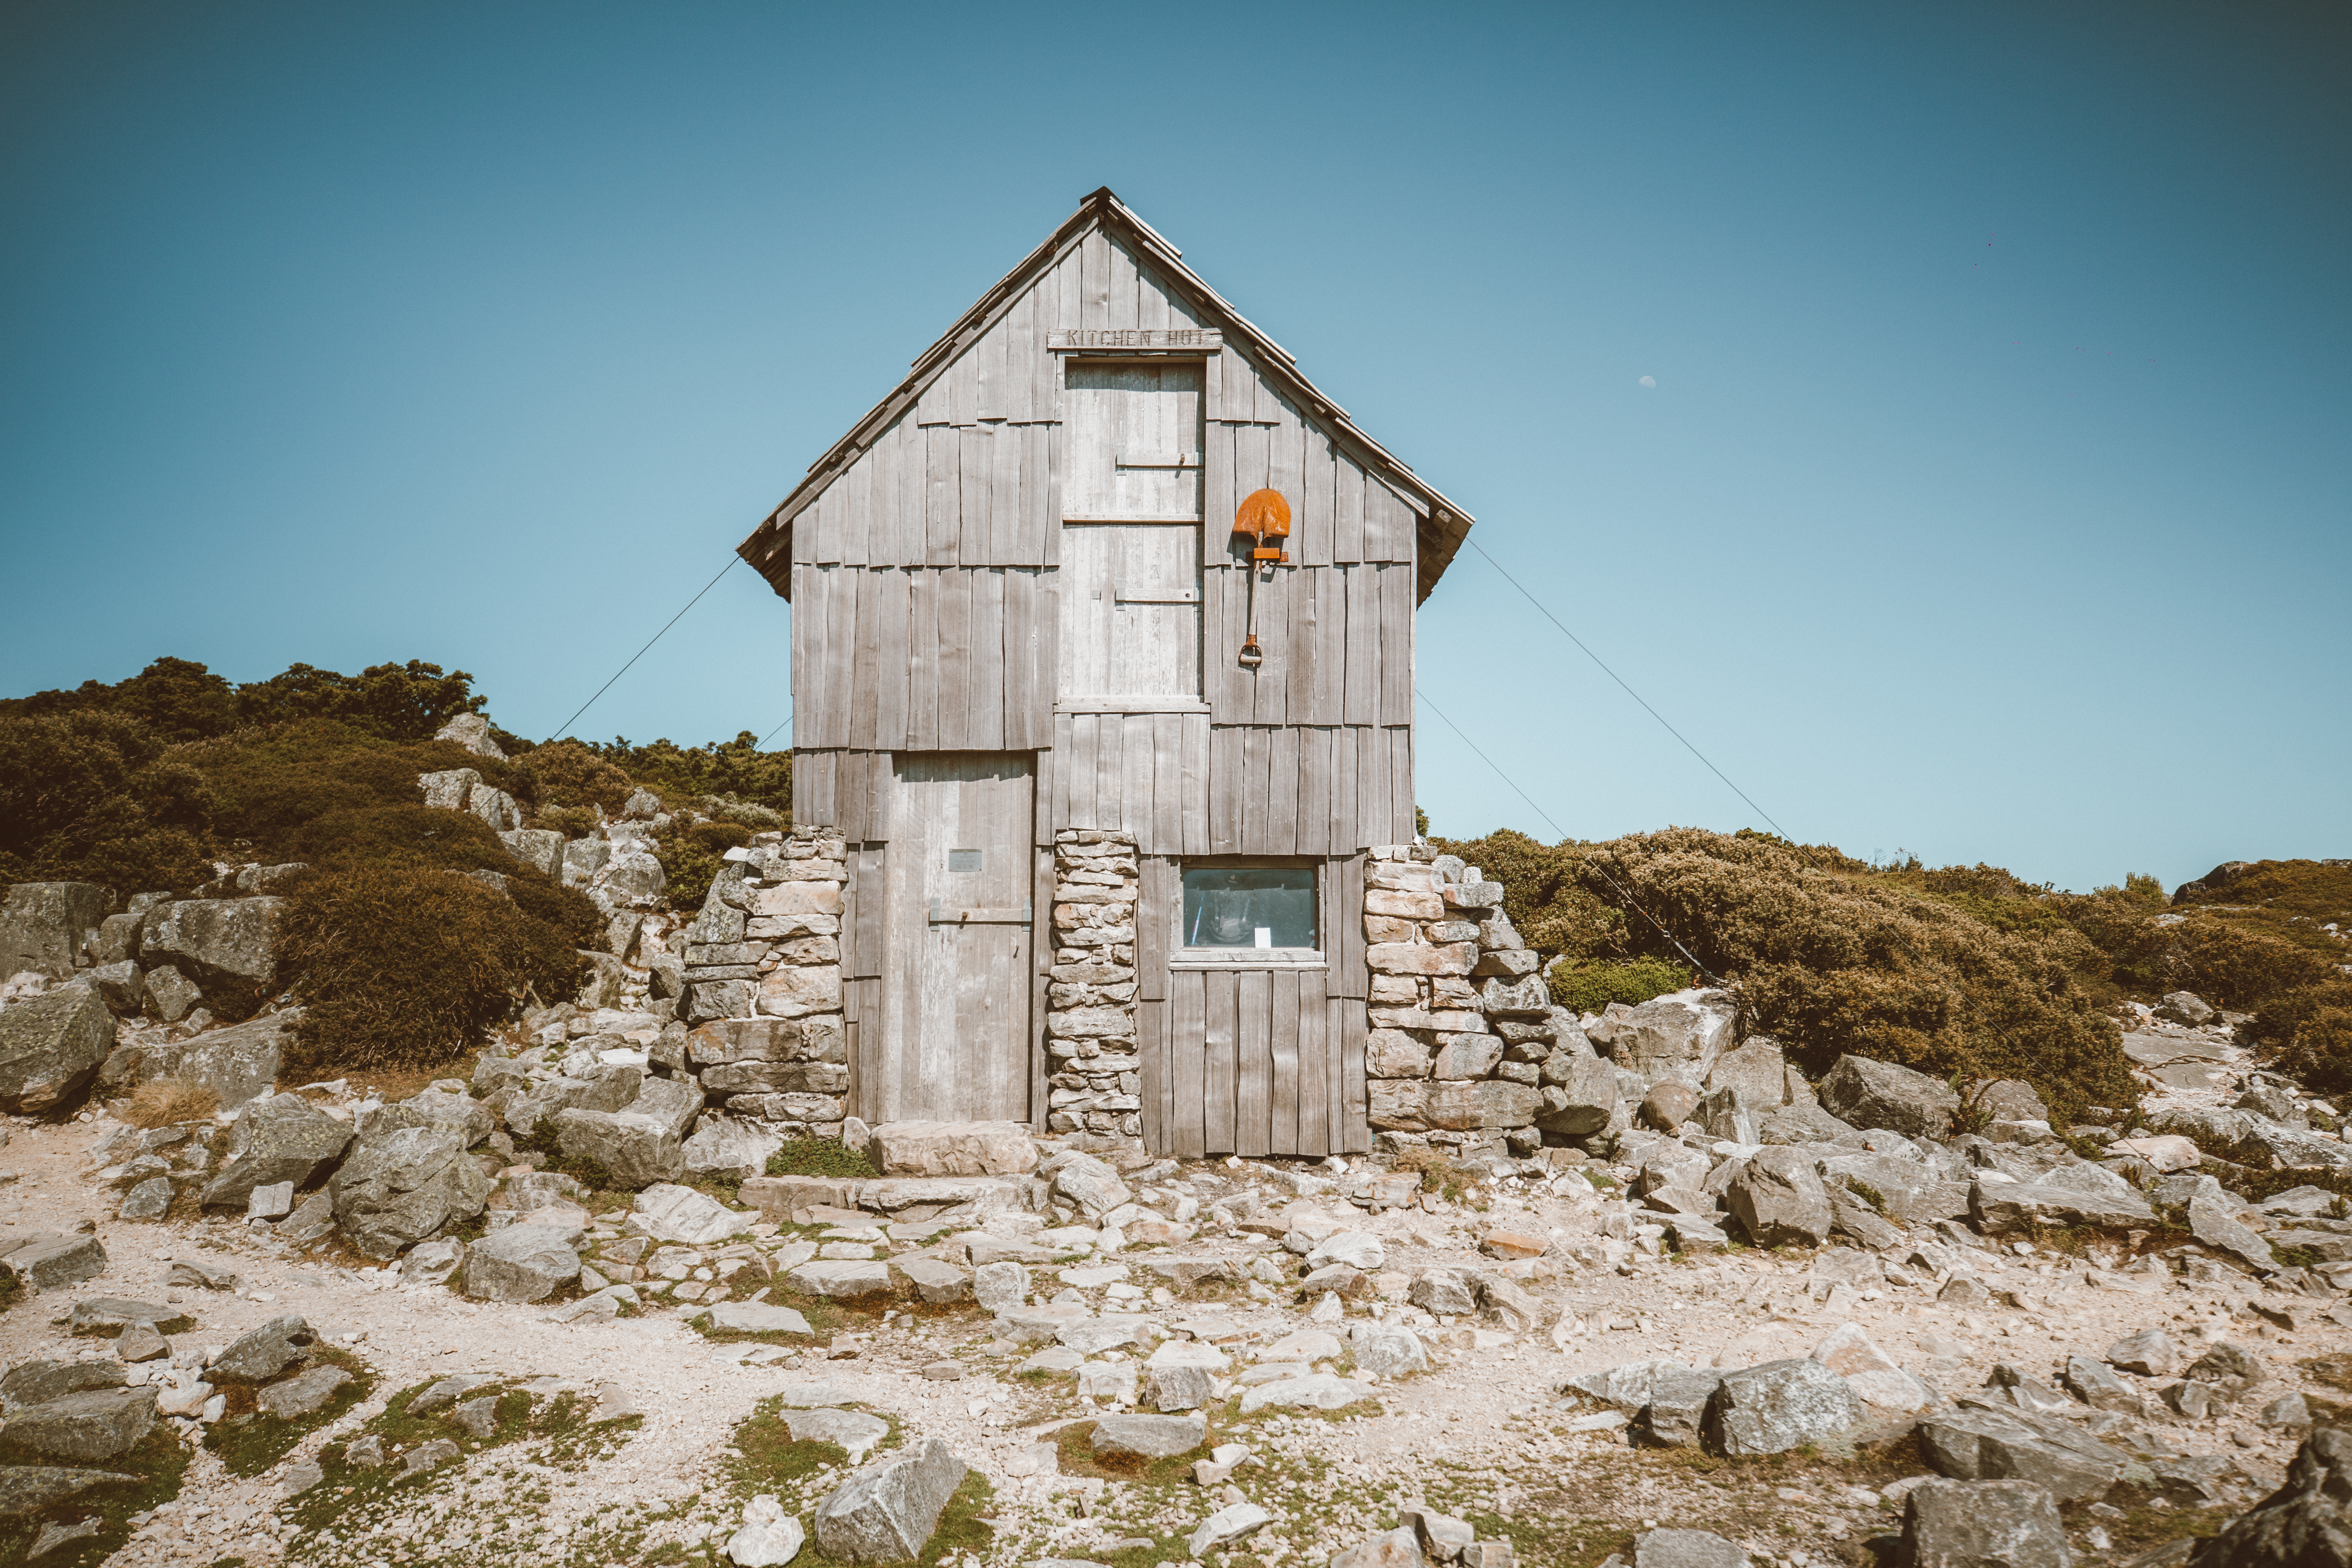
The walk then continues on to the base of Cradle Mountain, this part is fairly flat and takes you to the kitchen but which serves as emergency shelter.
We then took the face track so that we would continue our loop around Dove lake (but this time from up in the mountain rather than below!). This track is quite tough with a lot of loose rocks and climbing involved. The hike also took us up Hanson’s Peak and personally just after this peak was my favourite view as you can see the lake and the mountain all together.


Although this hike is only around 8 km it still took us 5 hours as there are a few steep sections (plus we stopped for lunch and photos). If you plan on doing the same I would recommend checking the weather before going, starting early, wearing suitable hiking gear and bringing plenty of water with you (and food too if you want to stop for lunch). You could also include the summit of Cradle Mountain in this hike, adding on around 1 hour more of hiking.
We then drove out following a shuttle bus – make sure you do this too as the road is narrow. The shuttle buses have walker talkie to communicate with each other so they know when to stop when to let another shuttle pass in the opposite direction.
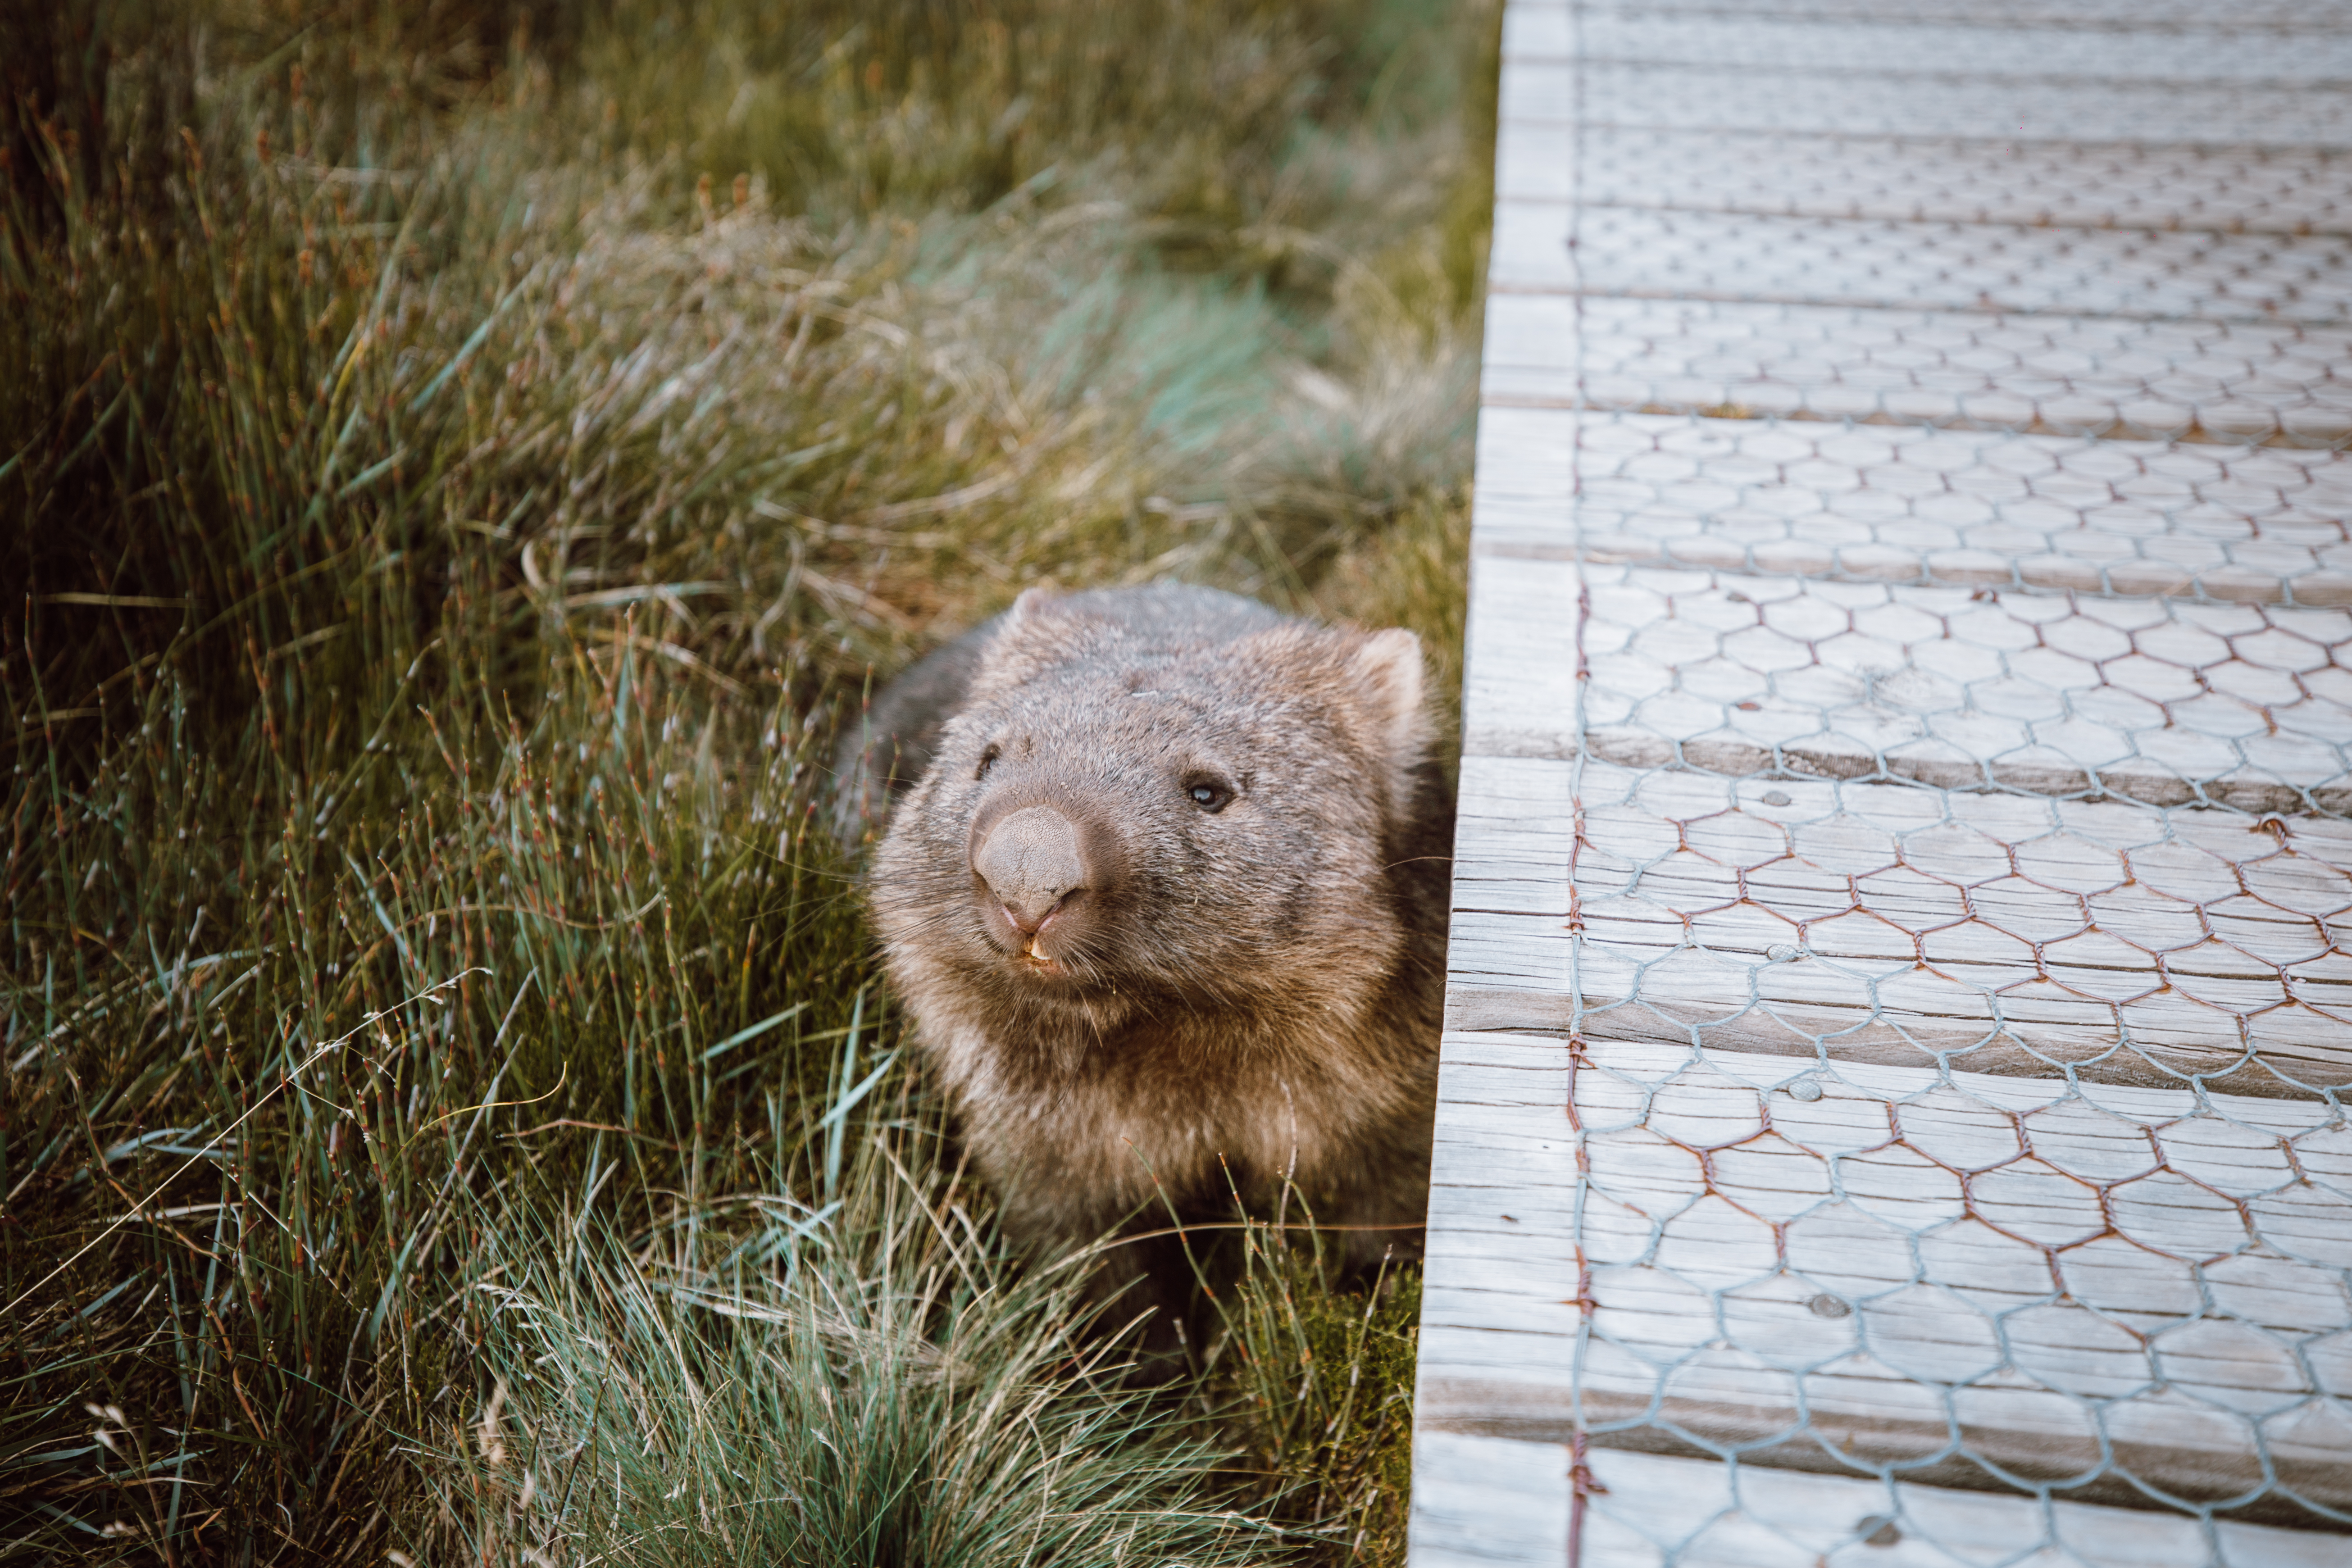
After resting a bit we came back into the national park at 6:30pm to try to see some wild wombats at Ronny Creek car park. You just need to walk along the track near this car park and you’ll be seeing wombats in no time (sometimes even during the day too). Please stick to the track and do not try to touch the wombats, just enjoy their cuteness from the path.
DAY 8 and 9 – MOUNT ROLAND
We had one last morning to enjoy Cradle Mountain National Park and decided to do the walk from the information centre to Ronny Creek car park and catch the shuttle back. This is a nice easy walk but it wasn’t that exciting and could easily be skipped.
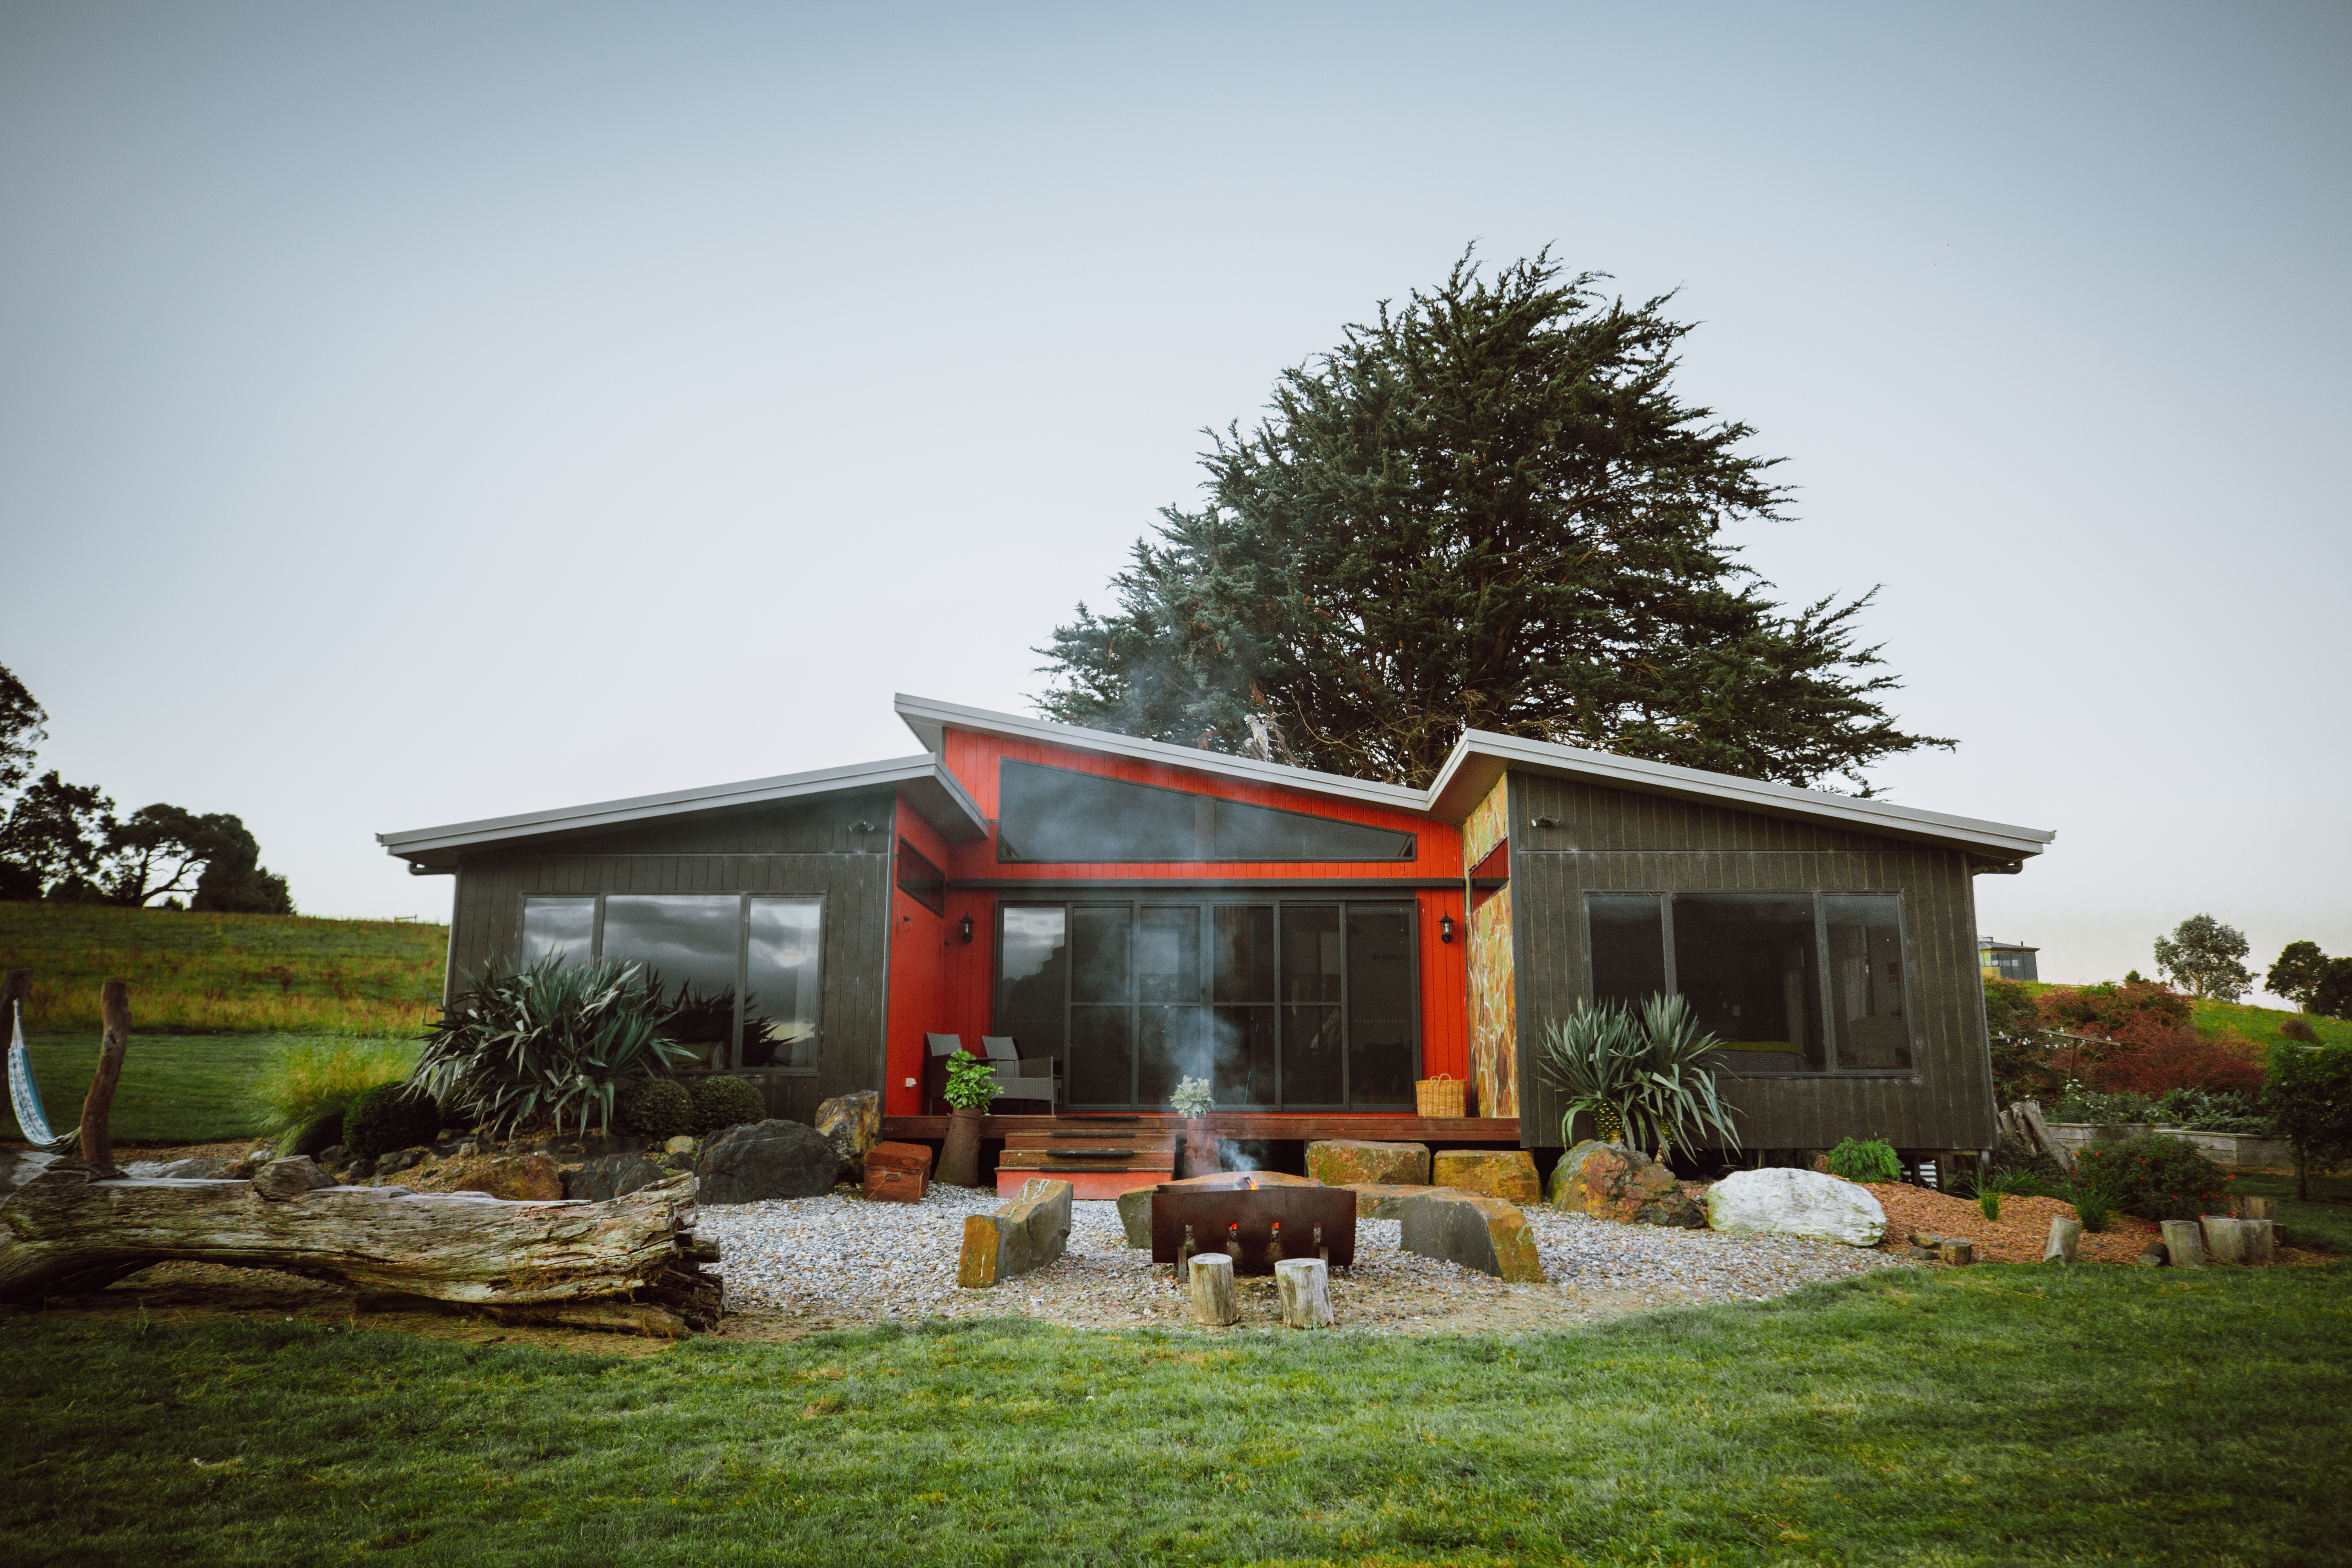
We then drove over to Mount Roland, a beautiful part of Tasmania, which is yet to become a tourist hot spot, but I’m sure it soon will! Especially with the beautiful Eagles Nest Retreat, an instagrammers dream accommodation, and perfect spot to spend a few days relaxing in the middle of your Tasmania trip.


We stayed in Nest iii which sleeps up to 6 people and has a large open plan lounge and kitchen area, as well as a beautiful garden with vegetable patch, chickens, an outdoor spa bath, a fire pit, hammocks and it’s own AMPHITHEATRE!!


Eagles Nest Retreat is a family run business offering luxury accommodation in a quiet rural area, making it the perfect spot to relax for a few days, or maybe even host a wedding! They have 3 nests with nest ii being the largest, and all 3 of them offer outdoor spa baths!
DAY 10 – BAY OF FIRES
We hit the road again heading 3 hours east to the Bay of Fires. We broke up the journey with a visit to Grindelwald and cataract gorge near Launceston.
We decided to stay in St Helens (at the Kellraine Holiday Units) as there was more budget accommodation available, and it was only a 15 minute drive to Binalong Bay (the start of Bay of Fires).
TOP TIP – Please be aware that there is 0 signal in Binalong Bay so I would stay in St Helens if you want to phone / use the internet at all.
DAY 11 – BAY OF FIRES
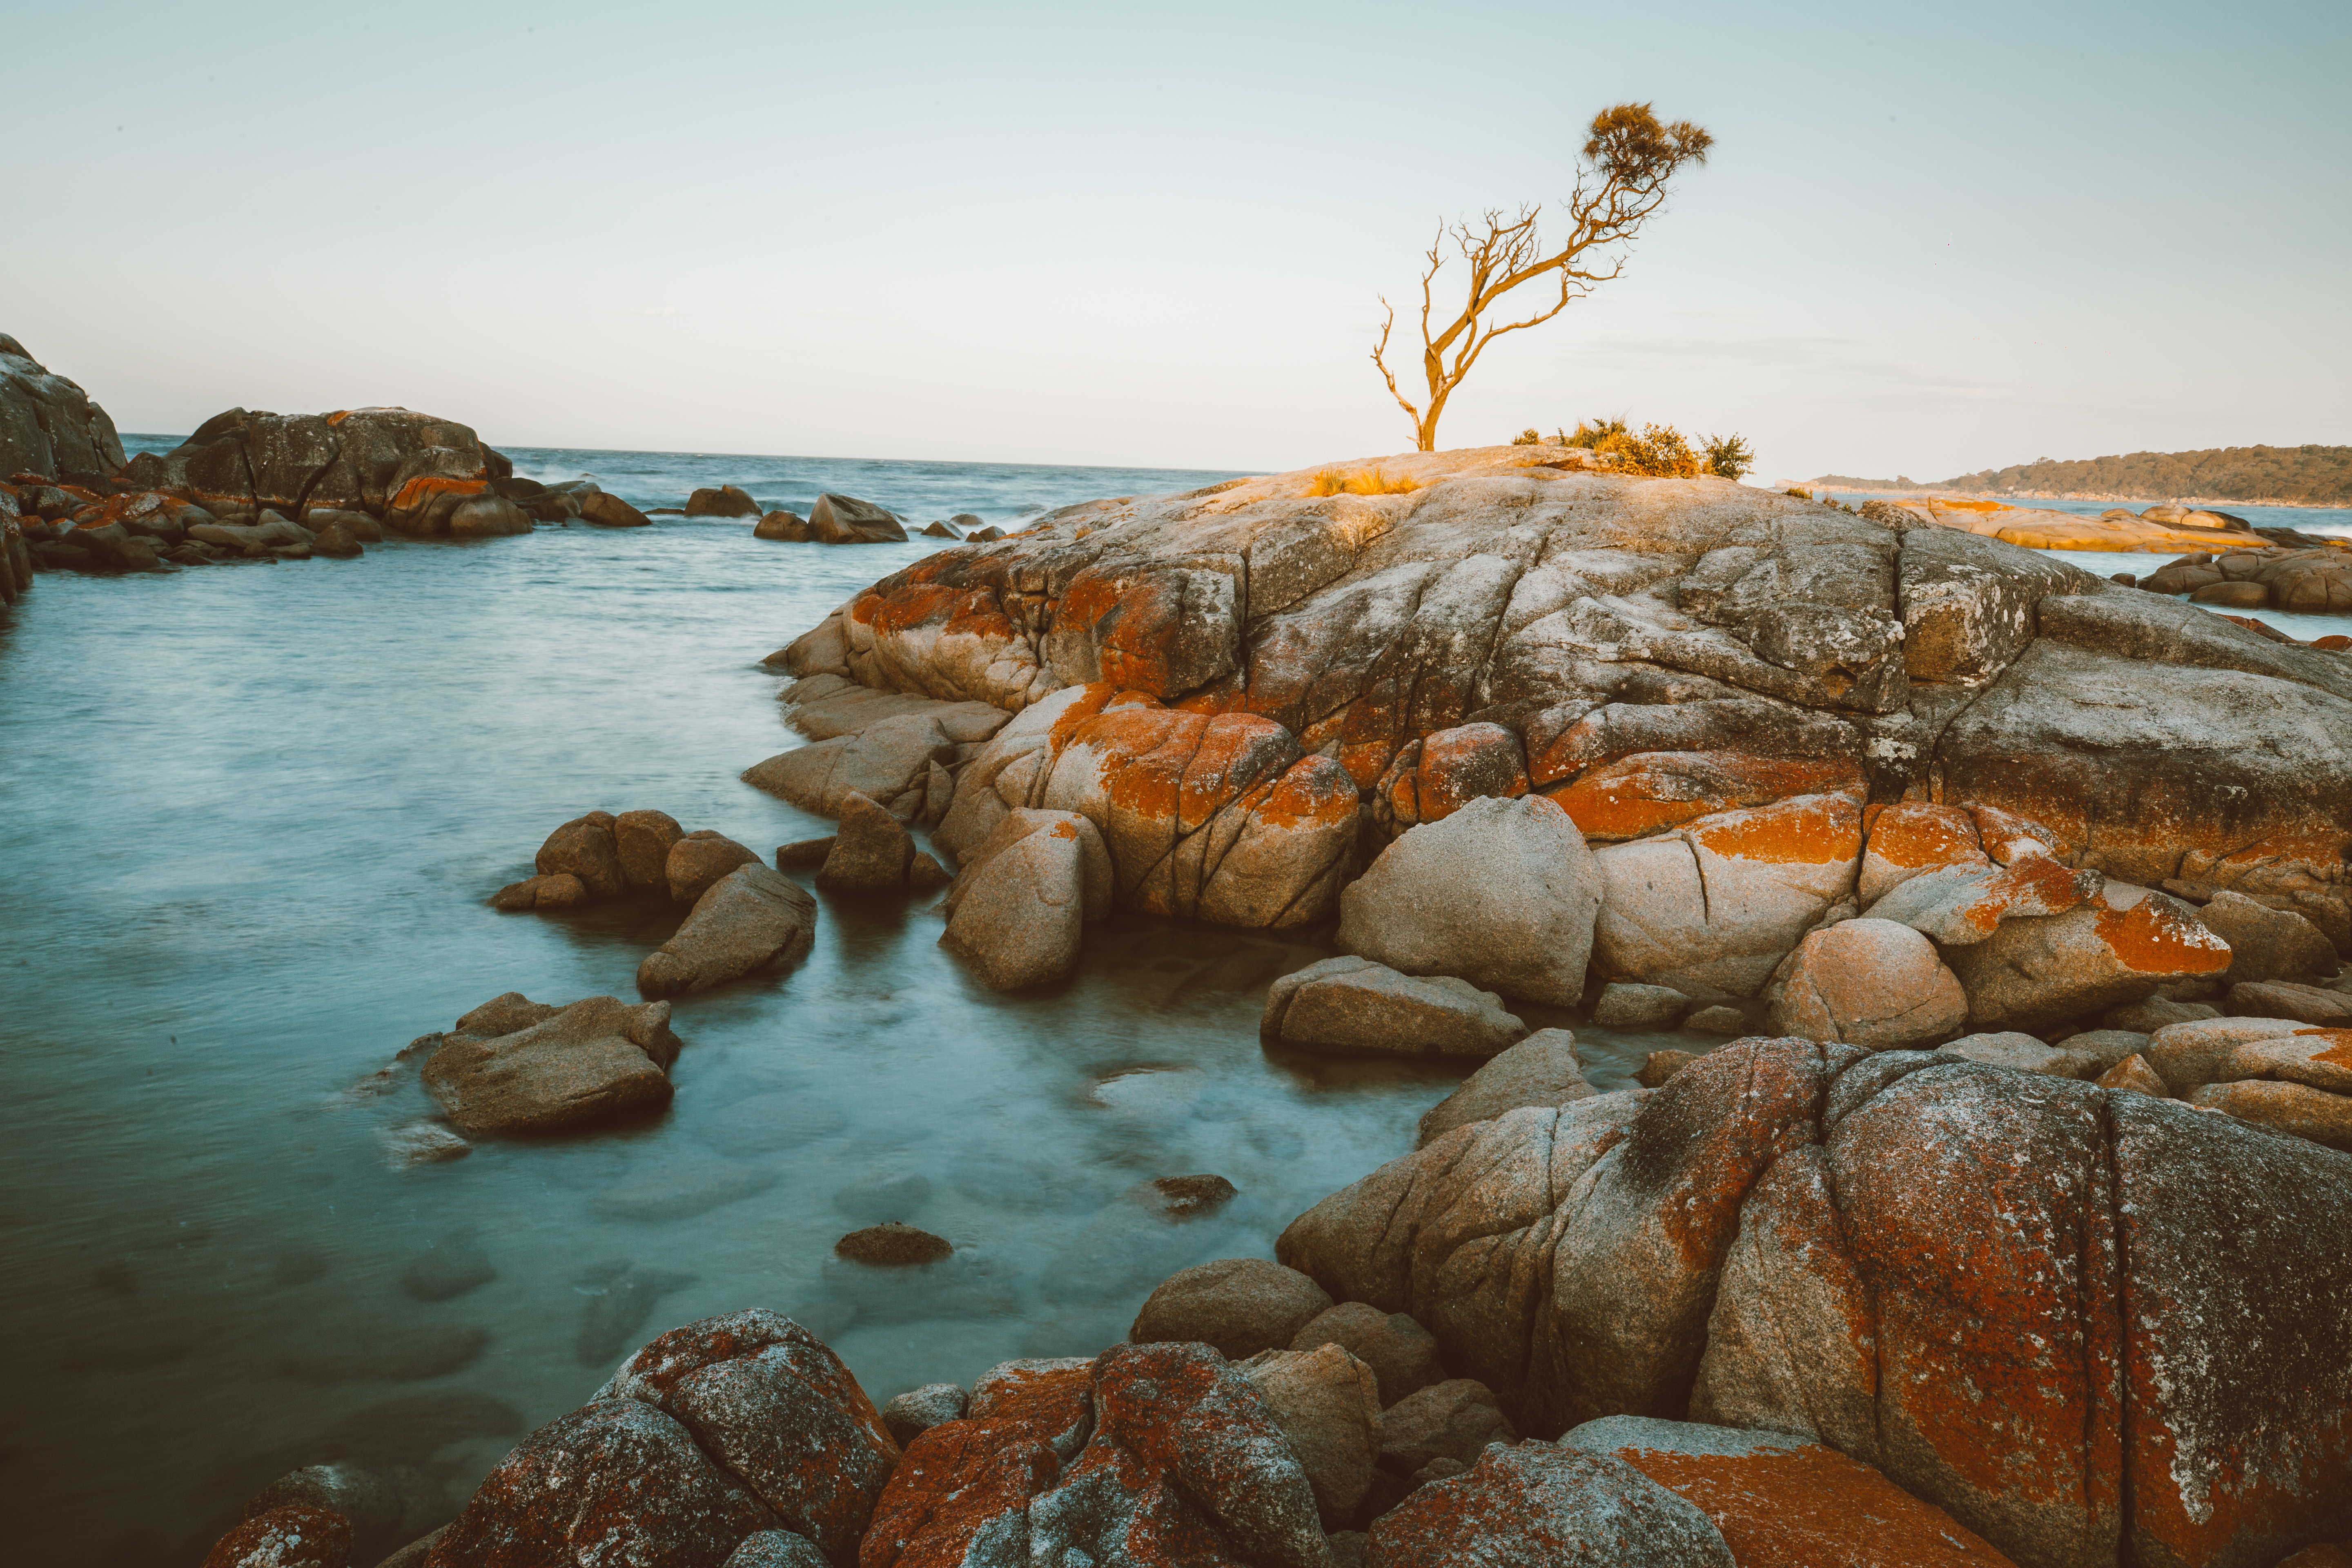
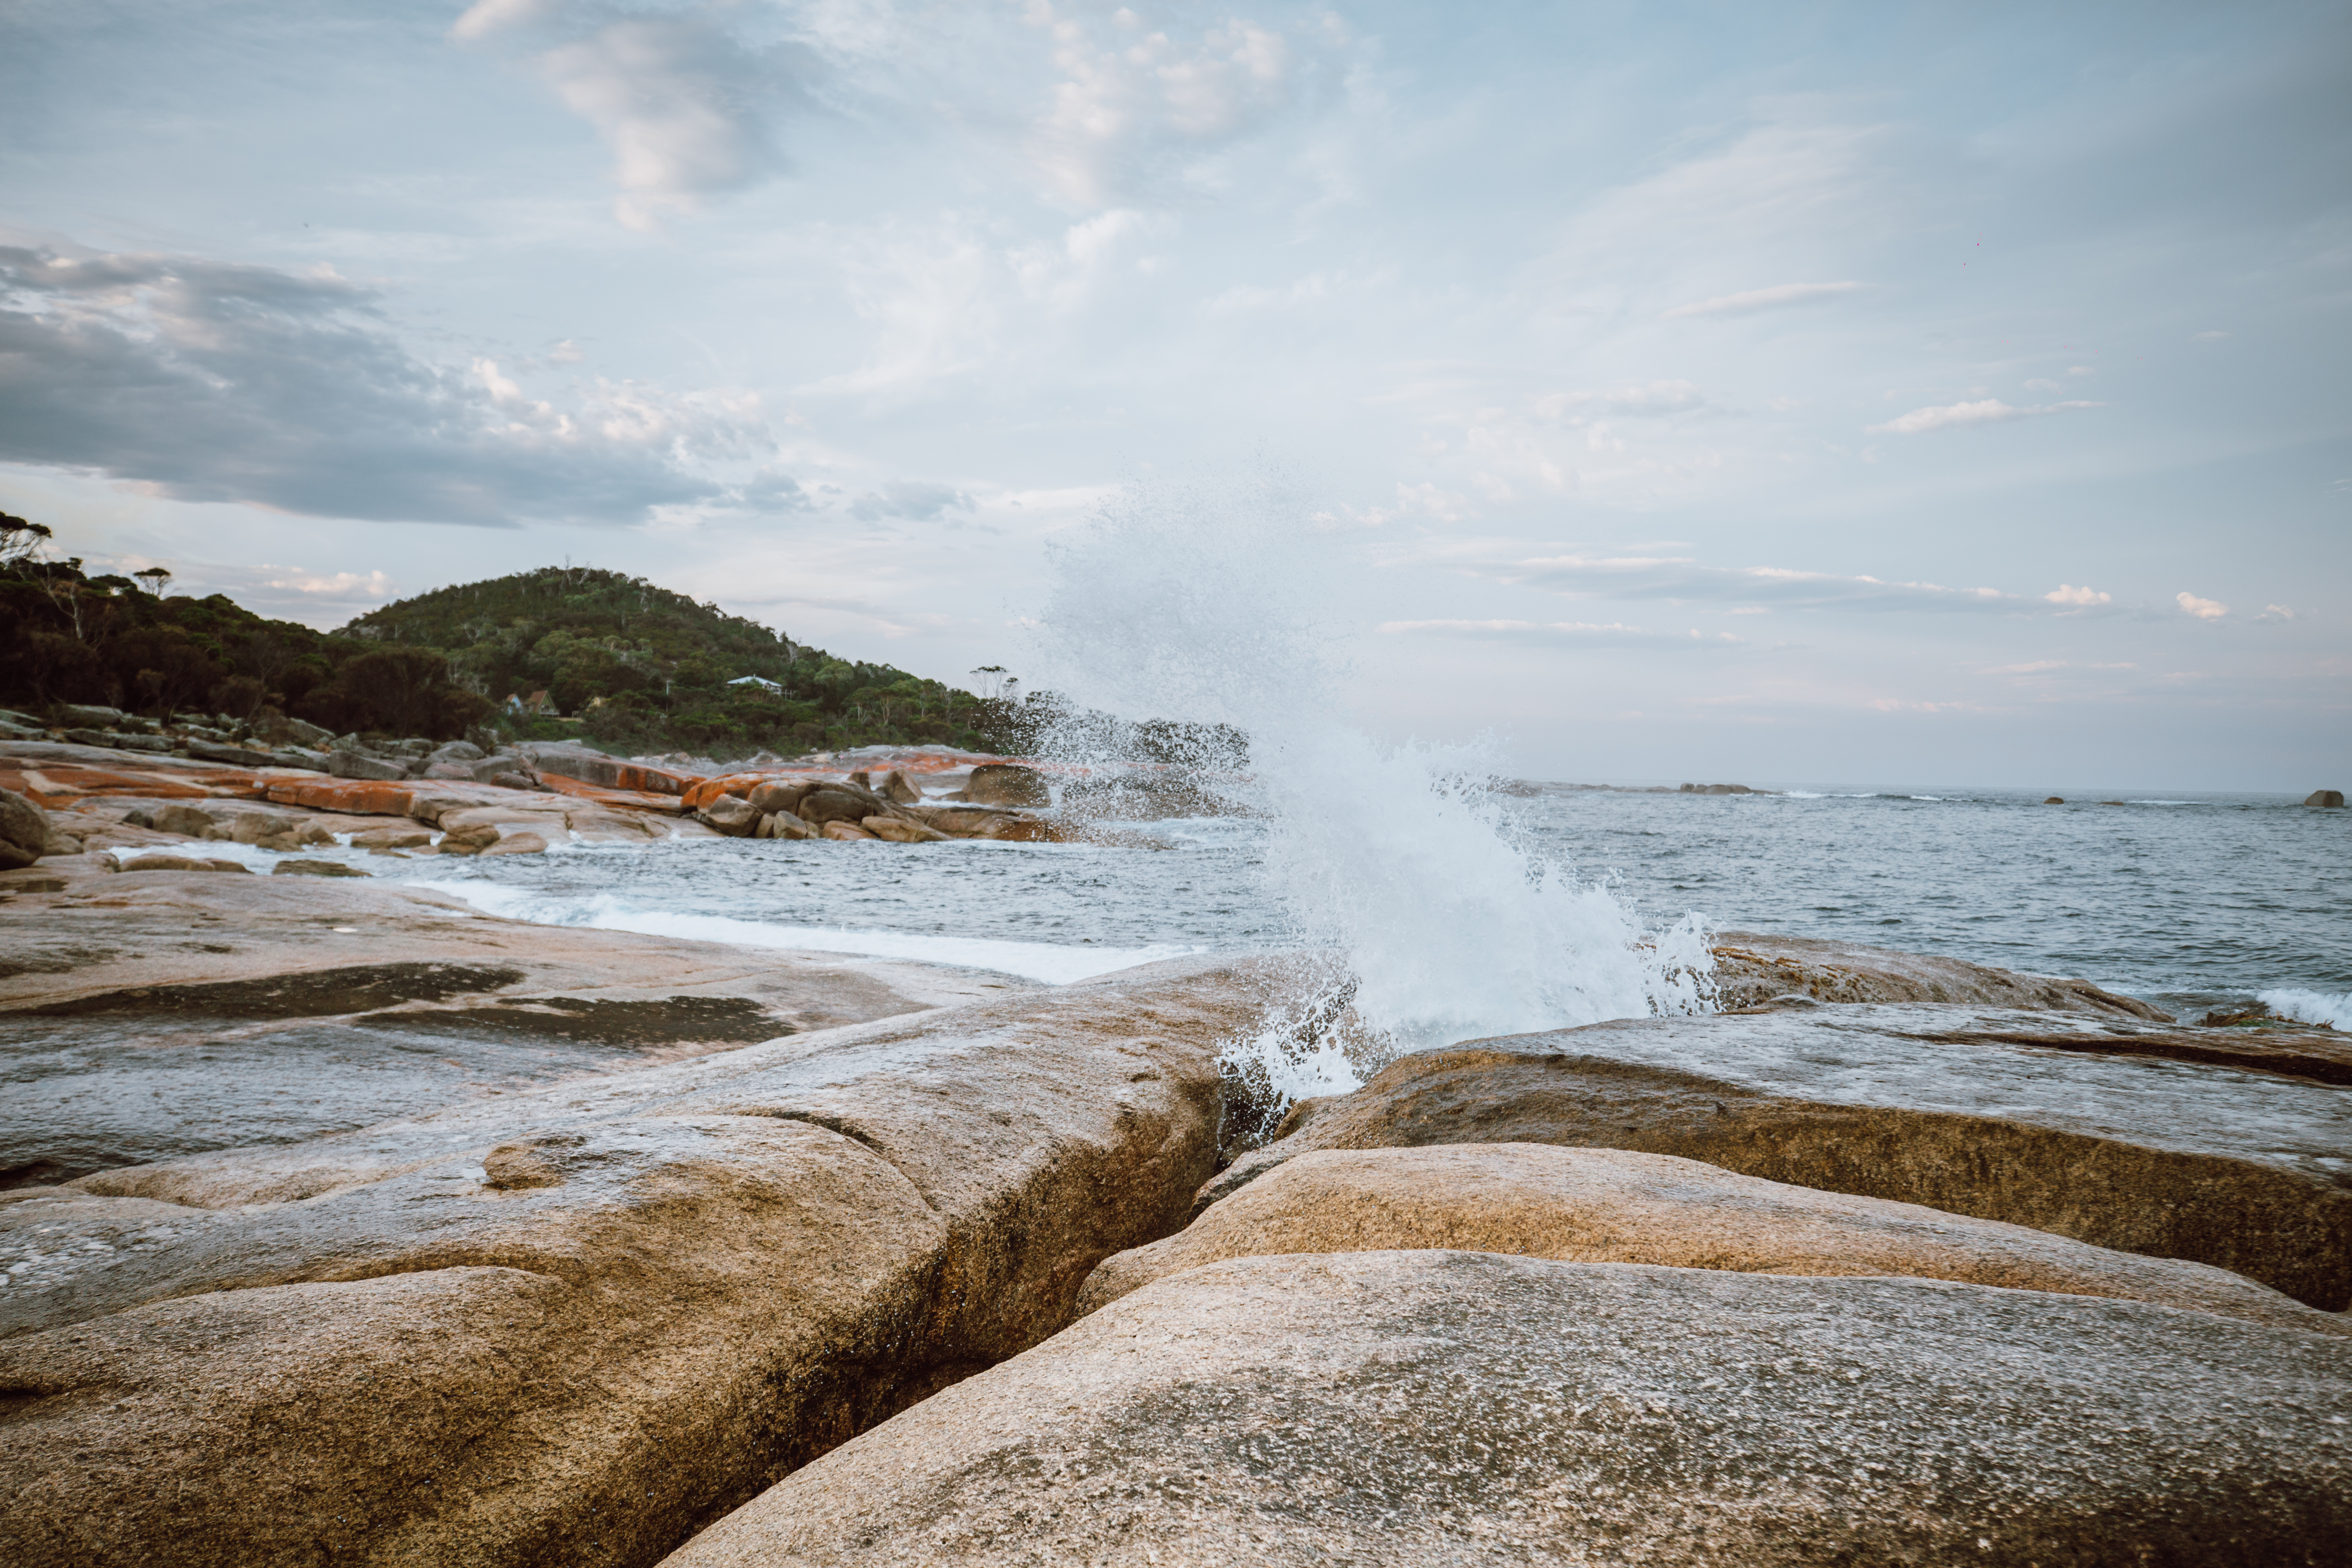
The Bay of Fires is famous for the lichen covered orange rocks that are scattered along the coastline, although that is not where it gets its name. The bay was given its name in 1773 by Captain Tobias Furneaux in Adventure, who saw the fires of Aboriginal people on the beaches.
The Bay of Fires has a number of beautiful beaches, if you’re visiting during the warmer months in Tasmania I would definitely recommend spending a day just exploring the local beaches, make sure you check out Binalong Bay and Jeanneret beach.

My favourite spot for photos was the lone tree in the rocks located near Skeleton Bay Reserve in Binalong Bay. There’s also a beautiful secluded beach and rock pool here!
DAY 12 – BAY OF FIRES AND BICHENO
We spent the day again enjoying the beaches in The Bay of Fires before driving 1.5 hours to Bicheno.
TOP TIP – Bicheno is the most budget friendly place to stay if you want to visit Freycinet National Park but you don’t want to camp.
We stayed at the Bicheno Caravan Park which was very reasonably priced.
It’s also where you can catch sight of the smallest penguin in the world, the little blue penguin! We parked at the end of Gordon Street at sunset and saw a couple of penguins about an hour after sunset.
TOP TIP – For the best chance to see the penguins you want to stand near the rocks as this is where they nest. You don’t need to book on a tour but make sure you don’t get too close to them, and don’t shine a light on them, this scares them away and can lead to them not coming back to the beach. You can use a red light if you have one.
DAY 13 – FREYCINET NATIONAL PARK
We spent the afternoon exploring Freycinet National Park. We went to Cape Tourville lighthouse, Honeymoon Bay, and Sleepy Bay. However I wish we had done the hike to Wineglass Bay as we were too tired to do it the next day after hiking up Mount Amos.
TOP TIP – If you have mosquito repellant don’t hesitate to use it, Sleepy Bay is full of mosquitoes!
You will need to purchase a national park pass to visit Freycinet National Park – you can either do this online or at the visitor centre.

When you go back to Bicheno you can use this time to check out the blow hole there! Make sure you go at high tide to see it as it’s best.
DAY 14 – FREYCINET NATIONAL PARK
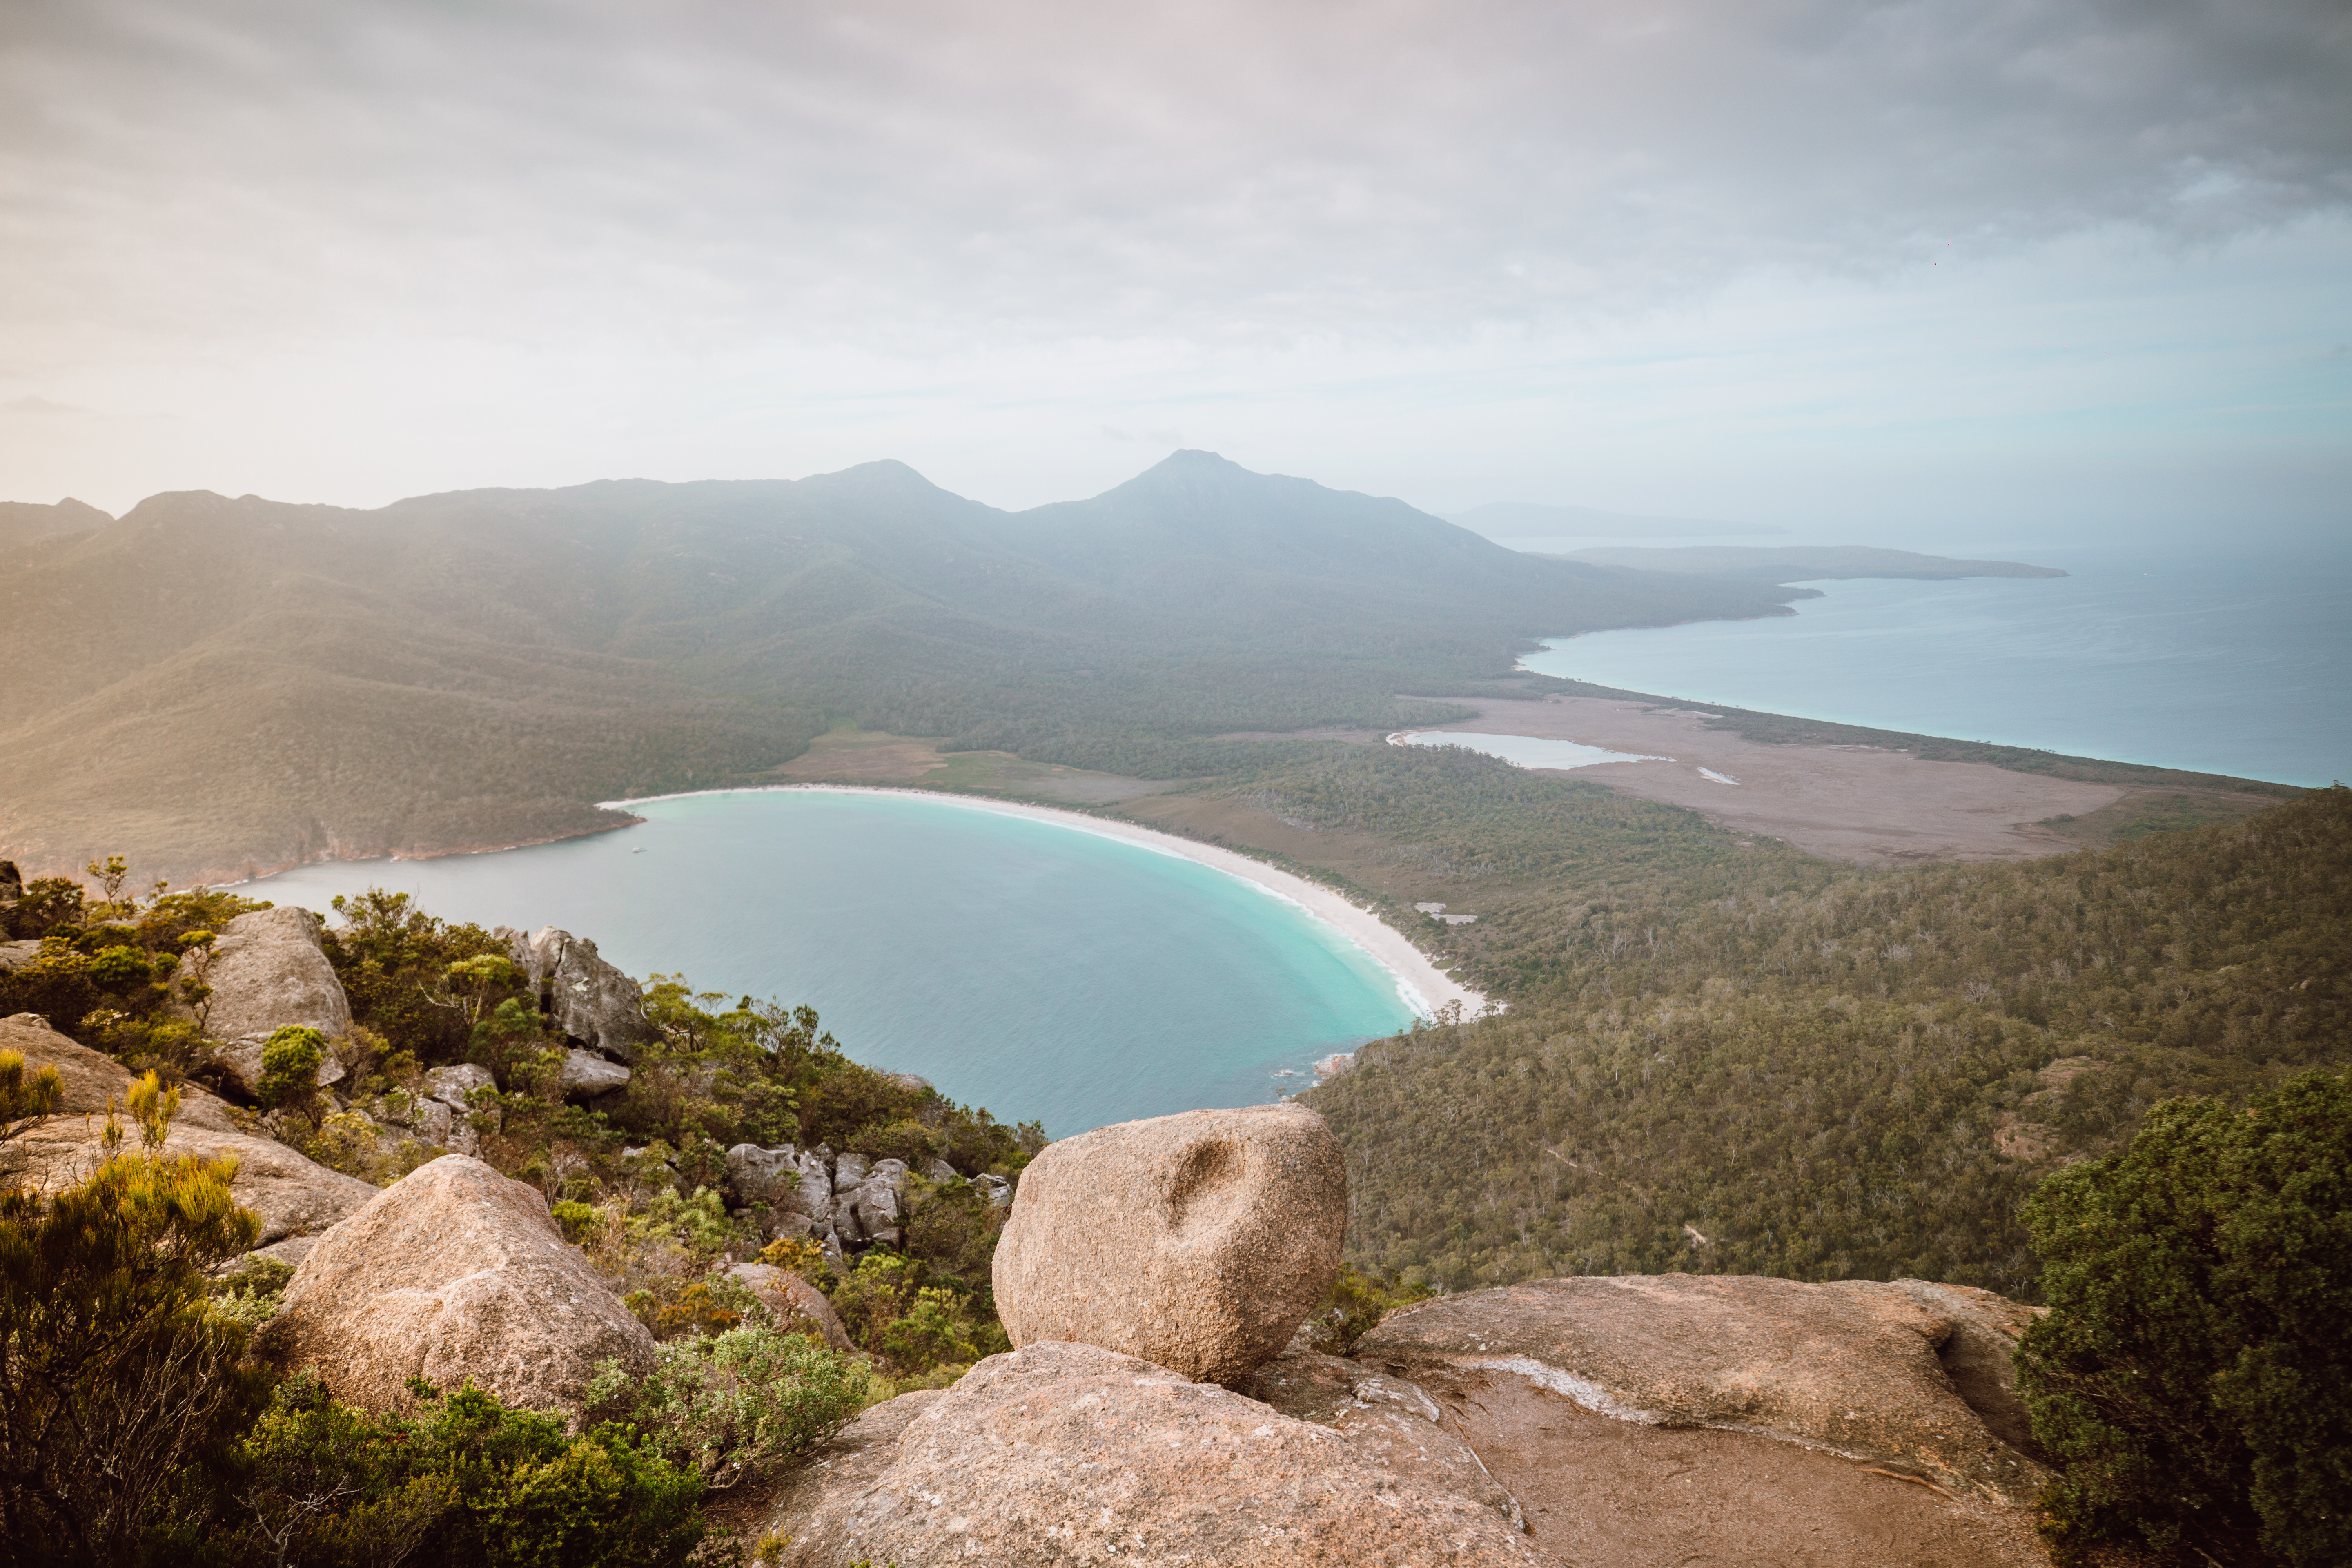
We woke up before sunrise to get to the car park at the bottom of Mount Amos an hour before sunrise. It took us an hour to hike up (but we were walking quite fast). This was one of the toughest climbs I’ve ever done as it is steep and very slippy! Make sure you wear proper trainers! I wouldn’t recommend doing this hike unless you are very fit.
The view from the top of Mount Amos is definitely worth the effort though! Even if we weren’t able to hike anymore that day (my legs were shaking the whole way down from the strain!)
If you are feeling up to it you could then hike to Wineglass bay, or I would recommend doing it on a separate day.
DAY 15 – HOBART
Head back to Hobart and tick off anything that you missed off before!
We stayed at the Hobart Central YHA again, make sure you book directly through their website for the best deal.
I hope my 2 week itinerary gives you a good idea of everything you can do during your Tasmania roadtrip. You could easily alter the itinerary to be slightly shorter or longer depending on how you like to travel.
Like this post? Pin it to save for later!

")
2 Comments
Most Instagrammable Spots in Tasmania - The Ginger Wanderlust
April 12, 2019 at 1:54 pm[…] opportunities and so many amazing instagrammable spots to discover! Make sure you check out my 2 week Tasmania Road Trip for a more detailed […]
Top 13 Amazing Beaches in Australia - The Ginger Wanderlust
May 16, 2019 at 1:13 pm[…] the hike to the beach itself, you will not be disappointed. If you’re road tripping around Tasmania you have to stop at Freycinet National […]