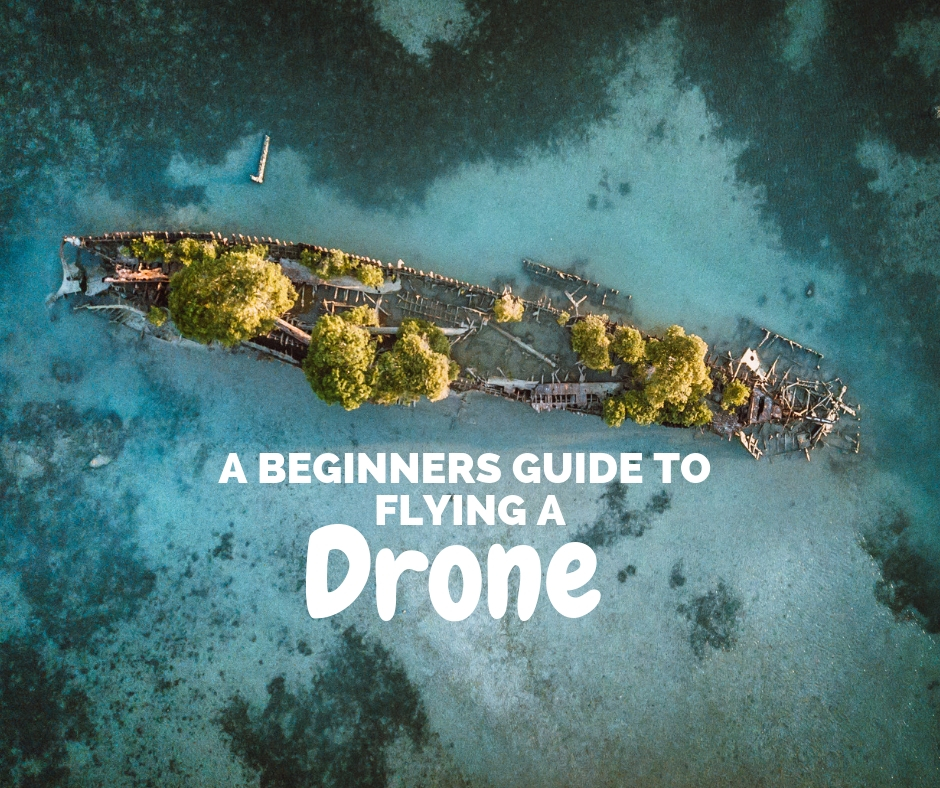
After a year of wanting one I finally bought my first drone a few months ago. I went for the DJI Mavic Pro Platinum as it is portable, has a better flight time than the Air (30 minutes instead of 20) and it is quieter. Flying it is a weird mix of incredible excitement and sickening fear! I love the perspective it brings but am also terrified that I will end up breaking it.
Drones are high tech pieces of equipment, and although the recent ones have been designed to make them easier to fly, there is still a lot to learn before you fly for the first time. If you’re new to droning then this post is for you! A handy and easy to read beginner guide to setting up and flying your DJI drone.
Getting started
Step 1: Read the Manual
In this day and age we want information straight away and thus tend to ignore manuals, I know that I am guilty of this! However I do urge you to read the manual for your drone so you can fully understand all the functions.
Step 2: Download the DJI Go app
In order to fly your drone you will need to have the DJI Go app installed.
From this app you can install any updates. Make sure you check if any are needed when you’re at home (and with wifi!)
Step 3: Practice with the flight simulator
Within the app you can practice flying a drone with the simulator. This way you can get used to the controls without having to worry about watching the drone.
Step 4: Turning on your drone
You would think this would be the easy part but it took me a few goes to work out how to do it! They also don’t explain it in the instruction manual. You need to press once and then hold the second press. Pressing once will just tell you how charged the battery is.
Step 5: Link the app to your drone
When you do this make sure that:
– The remote is on and connected to your phone via the cable
– Your drone is on
– The app is open
– The switch on your drone is set to remote (and not wifi). You will find the switch in the same part as where you insert the memory card.
I personally had trouble with step 5 as I didn’t realise I needed to change the switch to remote (again it does not explain this in the manual..!). Once you’ve linked the drone to the app have a look around at all the different tools, but don’t take off yet!


Flight preparation
Step 6: Calibrate your drone
Before you fly you will need to calibrate your drone so that it knows where it is located. I would recommend doing this at home to ensure there is no magnetic interference. You will need to do this every time you travel a large distance.
Step 7: Check the battery
An obvious step but so important! I personally have three batteries and always make sure to have two of these fully charged (I bought the fly more package). Just click on the button on the battery to see how much charge is left (four lights indicates it’s fully charged). The same goes for the remote, just click the on button and it will say the charge percentage.
Step 8: Check where you can fly
Drone laws differ from country to country. Make sure you know the guidelines for your country as well as for the specific place you wish to fly.
In general you cannot fly a drone within 30m of people or buildings, or within five miles of an airport. In Australia you cannot fly higher than 120m. Some countries might have a specific app so that you can easily check where you can fly. In Australia I use the ‘Can I fly there’ app.
Step 9: Check the weather conditions
Avoid flying your drone if it is raining or too windy. In general you should avoid flying in winds that exceed 30kph/18mph.
Step 10: Update your firmware
You might think that your drone is new and therefore you don’t need to do anything, but you are WRONG! The firmware is always being worked on and when you buy the drone it might have been sitting in its box for a few months already. You will need to regularly check the app to see if you need any updates. Make sure you do this at home where you have wifi!


First flight
Step 11: Choose a wide open space outdoors with not many people or obstacles
For your first flight do NOT go somewhere where you want to take photos/videos. For your first flight you want to concentrate just on getting used to flying the drone. Choose a wide open space OUTDOORS which isn’t busy and doesn’t have any obstacles (tress, telegraph poles etc). Turn on the obstacle avoidance, but do not rely on it!
Step 12: Update your home point
Before taking off make sure that your home point is updated. You can select your home point to be to yourself or to your drone’s current location. This way if you accidentally lose the drone in the air it will return to this location.
Step 13: Take the gimbal cover off
In order for the drone to effectively function you will need to remove the gimbal covers (the plastic bits). If you don’t do this you will get an error pop up on the app.
Step 14: Take off and hover
To take off you will click the ‘take off’ button (left of screen) and then slide the lever right. The drone will then take off and hover about 1m above the ground. Let it hover for a while whilst you check that there are no obstructions and that the drone is functioning properly.
Step 15: Use beginner mode to practice
For your first flight I would recommend using the beginner mode. You want to avoid sharp movements when you’re flying the drone, push the control sticks gently.
Click on the three dots in the top right hand corner, the drone icon and then you’ll see ‘beginner mode’. The beginner mode will restrict your speed and altitude, which will give you more time to make any needed adjustments and reduce your chance of crashing. I would also avoid flying backwards as there are no sensors on the back (and you can’t see the camera).
Step 16: Avoid the Automation tools
The automation tools are great when you are looking to get footage but are useless on your first flight. You should only use these when you know that there are no obstacles around you.
Step 17: Keep the drone in sight
For your first flight don’t fly too far away, sometimes the drone can lose GPS or the camera might stop working. By keeping the drone in sight you lower the risks of losing it.
Step 18: Keep an eye on the battery
When you are flying there will be a timeline at the top of the screen to inform you of the battery life of the drone. Don’t fly too far away as the drone might not have enough battery to return. DON’T LET THE BATTERY DROP BELOW 30%.
Step 19: Play around with the remote and app
As your first flight is in a controlled environment it is the best place to accustom yourself with the remote. The remote has buttons to change the photo from portrait to landscape, take photos/film, move the gimbal, and of course move the drone!
You might also want to have a go at turning the camera onto manual and updating the settings (you only need to change the ISO and Shutter Speed), learn more about manual mode. I found the automatic to be way too over exposed, so I always shoot manual. You can even set this up when the drone is on the ground, as long as the camera is on and you can see your surroundings.
Step 20: Don’t land on sand/dust
To land you just need to pull down on the lever and the drone will then land itself when it’s within 1-2m of the ground. Make sure the surface below the drone is flat and void of sand/dust/plants.
On a few occasions I have caught my drone in my hand so that I don’t have to land on sand/ an uneven surface but I wouldn’t try this on your first flight (nor if you have a large drone).
Congratulations you are now a drone pilot! You might wish to do a few more flights in a controlled environment before heading out and shooting footage.
Like this post? Pin it to save for later.

")

1 Comment
Maartje Hensen
November 4, 2018 at 3:13 amWe were so scared flying our drone the first times hahah. Now we found a good balance while flying it, I fly it and Rox keeps an eye out on the sky. Your guide will really help people flying their drones for the first time!